Menu
OBD2 Scanner Blog
  • Home
  • Car Diagnostic Tool
    • MB Star Diagnosis
    • BMW Diagnostic Tool
    • GM Tech2
    • Volvo Vocom Interface
  • OBD2 Code Scanner
    • VXDIAG
  • Tech Support
OBD2 Scanner Blog

Volvo D1 D2 Marine Diesel Engine Timing Gear & Injection Pump Installation

Posted on May 26, 2023 by
On Sale: Scania VCI3 US$89.00, SmartPRO 5000U-PLUS Programmer US$2190.

This illustration show you steps on how to install timing gear and injection pump for Volvo D1 D2 marine diesel engine.


Related Contents:

2018 Volvo Penta VODIA5 5.2.50 Diagnostic Software Free Download

Volvo Penta EPC 6 2023 2016 Offline Free Download


STEPS:

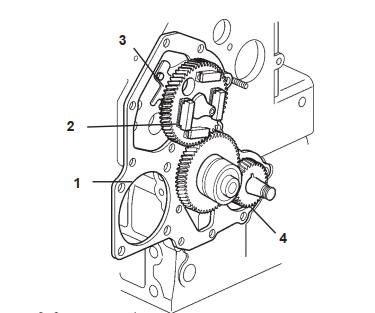
1.Install the timing gear plate (1) with new gasket.
2.Oil the camshaft bearing surfaces and carefully lift the camshaft (2) into place, complete with drive gear and regulator weights.
Note. Be careful to avoid damaging the bearings,bearing tracks and camshaft lobes.
3.Install lock plate (3) for the camshaft in the correct position and torque it.
4.Put the key in place in the crankshaft and install the crankshaft pulley (4).
IMPORTANT! The components must be oiled before installation.
IMPORTANT! Make sure that the gear wheel markings coincide.

Volvo D1 D2 Marine Diesel Engine Timing Gear & Injection Pump Installation (1)

5.Install the thrust washer (5) on the idler wheel shaft stub. Install the idler wheel (6) in accordance with the markings.
NOTE! Do not turn the crankshaft before the timing gear cover has been installed.
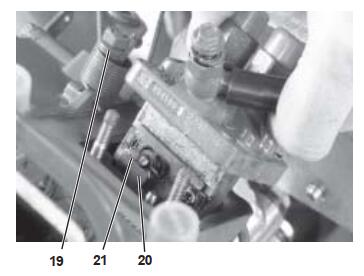
6.Install the inner rotor (7) and the oil pump cover (8). Install shims (9), spring (10), spring washer
(11) and lock washer (12).
7.Adjust the oil pump end float (13) to 0.10 – 0.15 mm. Shims (9) are available in thicknesses of 0.10; 0.15; 0.20 and 0.50 mm.
8.Install a new, possibly adjusted gasket for the timing gear cover. Center the cover in front of the oil pump.
Note. Check that the tubular pin (14) in the timing cover can engage in the hole (15) in the oil pump cover.
Turn the cover back and forwards, and center it in the mid position. The stop arm (16) must be turned and held in place when the timing cover is installed.

Volvo D1 D2 Marine Diesel Engine Timing Gear & Injection Pump Installation (2)
9.Check that the starter spring (17) is correctly located in the timing cover, and is connected to the regulator arm (18).
Put the timing gear cover in place. Insert the regulator arm through the hole in the engine block.
Screw the timing gear cover down.

Volvo D1 D2 Marine Diesel Engine Timing Gear & Injection Pump Installation (3)
7.Turn the stop arm (19) clockwise and connect the arm (20) to the injection pump. Install the clip
(21)

NOTE! Be careful to ensure that the shim/gasket which was placed underneath the injection pump flange is put back, before the pump is placed in the block (applies when the pump has been removed).
8.Torque the injection pump, please refer to the“Technical Data” chapter for tightening torque.
9.Install a new front crankshaft seal, please refer to“Front crankshaft seal, changing”. Put the key in place in the crankshaft and install the crankshaft pulley.

Volvo D1 D2 Marine Diesel Engine Timing Gear & Injection Pump Installation (4)

More case for Volvo Penta,please refer to Volvo Penta Trouble Repair

How useful was this post?

Click on a star to rate it!

Average rating / 5. Vote count:

This Post: Volvo D1 D2 Marine Diesel Engine Timing Gear & Injection Pump Installation From ChinaOBD2 Official Blog
Please keep this link if you copy the post!

Post navigation

Prev: Prev: DELCO E39 ECU Clone by Launch X431 IMMO Pro
Next: Next: JLG X14 X19 X23 Compact Crawler Boom Hydraulic Motor Disassembly

Leave a Reply Cancel reply

Your email address will not be published. Required fields are marked *

Recent Posts

  • ISUZU Truck Flood Conditions Inspection Guidelines
  • Doosan Heavy Duty Machine Pump EPPR Valve Check Guide
  • How to Use eTechnician Diagnostic Software Function Test?
  • How to Remove and Install DC Converter for Volvo EC18 Electric
  • How to Use Bendix ACOM Pro Diagnostics Vehicle History Function?

Recommend OBD2 Scanner

ME9.7 ECU Engine Computer ME9.7 ECU Engine Computer ThinkTool Pros+ ThinkTool Pros+

Recent Comments

  • Dennis on VAG EDC15 EDC16 IMMO OFF Software Free Download
  • Micheal Calsika on Scania SDP3 2.53.1 Diagnosis & Programming Free Download
  • Nicholas Michael Hutton on Range Rover Freelander EWS3 Key Programming by AK90 & IKeyClone
  • Leszek on Xentry OpenShell Patcher Edition v3.3 Download for Win 7/8/10
  • JOHAN on Latest VIIPlusLoader-08.020.08 for HEX V2 Free Download

Archives

  • September 2023
  • August 2023
  • July 2023
  • June 2023
  • May 2023
  • April 2023
  • March 2023
  • November 2022
  • July 2022
  • June 2022
  • March 2022
  • February 2022
  • September 2021
  • March 2021
  • February 2021
  • November 2020
  • October 2020
  • September 2020
  • August 2020
  • July 2020
  • June 2020
  • May 2020
  • March 2020
  • January 2020
  • December 2019
  • November 2019
  • September 2019
  • August 2019
  • July 2019
  • June 2019
  • May 2019
  • April 2019
  • March 2019
  • February 2019
  • December 2018

Categories

  • BMW Diagnostic Tool
  • Car Diagnostic Tool
  • Key Cutting Machine
  • Key Programming Tool
  • MB Star Diagnosis
  • OBD2 Code Scanner
  • Tech Support
  • VXDIAG

Tags

adapter Auto Pick and Decoder Car Key Copy Car Key Programmer cat Code Reader ECU Chip Tunning ecu programmer EEPROM EPROM Ford gm handy baby Handy Baby 2 Key Programmer Handy Baby II Key Programmer HEX V2 immo iprog key Key Pro key programmer laptop Launch lish LISHI new arrivals nexiq nexiq link diesel truck interface nexiq truck diagnostic NEXIQ USB Link OBD2 original program Scania VCI smart VAG COM Cable VCDS VCDS Cable VCDS VAG COM Cable vci VW wholesale X-PROG Box X-PROG Box ECU Programmer XPROG-M

Hot Selling

  • ME 9.7 ECU Engine Computer
  • MINI VCI J2534
  • NCF29XX Programmer
  • ThinkTool Pros+

Links

  • China OBD2
  • EPS Foam Machine
  • pcb assembly
©2023 OBD2 Scanner Blog | Supported by ChinaObd2.com