Skip to content
Menu
OBD2 Scanner Blog
  • Home
  • Car Diagnostic Tool
    • MB Star Diagnosis
    • BMW Diagnostic Tool
    • GM Tech2
    • Volvo Vocom Interface
  • OBD2 Code Scanner
    • VXDIAG
  • Tech Support
OBD2 Scanner Blog

Xhorse Condor XC-MINI Plus II Use Guide: Installation / Activation / Calibration / Update

Posted on December 24, 2024 by VCDS

Xhorse Condor XC-MINI Plus II Use Guide including How to install Cutter and Clamp, Activation, Calibration and Update.

Part 1. Installation
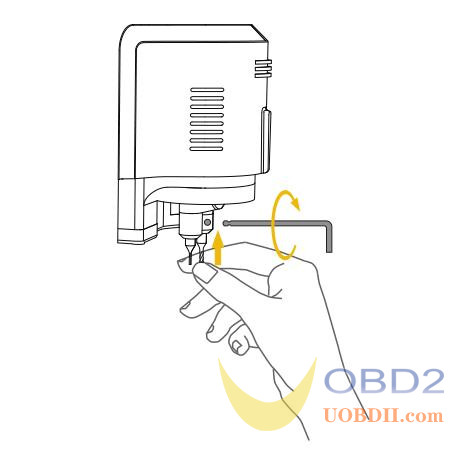
Install Cutter

1)Put the cutter into the mounting hole and make sure the cutter goes to the limit of the top.

2)Use the cutter tightening wrench to clockwise fix the cutter
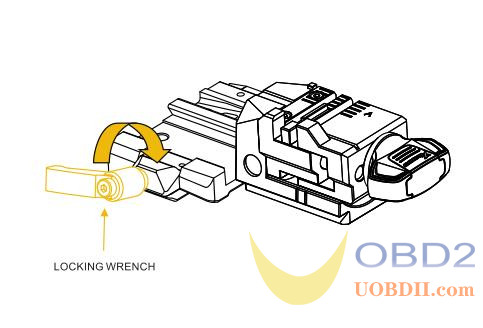
Xhorse Condor XC-MINI Plus II Use Guide: Installation / Activation / Calibration / Update

Install Clamp

1)Loosen the clamp-tightening wrench by turning it counter-clockwise.

2)Select the correct clamp and slide in the clamp to the clamp holder and push it to the limit of left.

3)After the clamp is put in the clamp platform, turn the clamp tightening wrench clockwise.
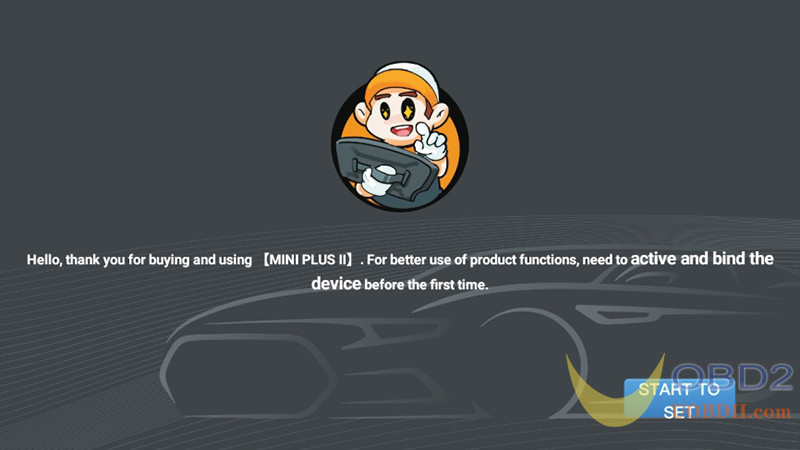
Xhorse Condor XC-MINI Plus II Use Guide: Installation / Activation / Calibration / Update

Part 2. Activation

1)Select the machine language

2)After the machine is connected to the power cord, turn it on, enter the main interface, and click the “START TO SET” button

Xhorse Condor XC-MINI Plus II Use Guide: Installation / Activation / Calibration / Update

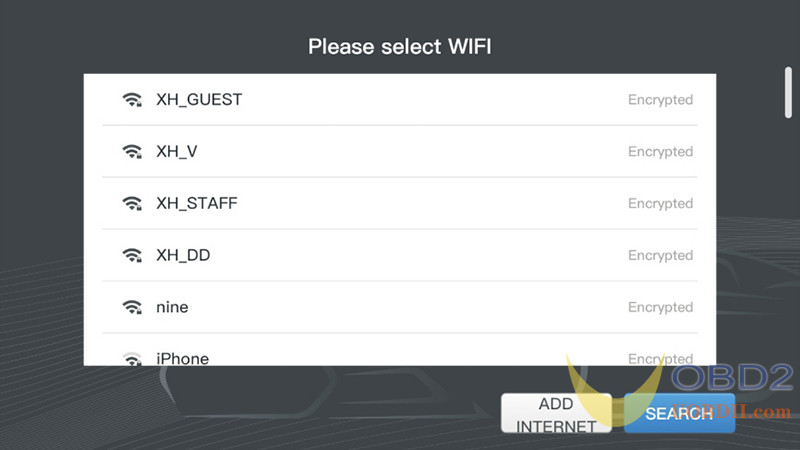
3)Click to select a Wi-Fi network

Xhorse Condor XC-MINI Plus II Use Guide: Installation / Activation / Calibration / Update

4)After entering the password, click the “Connect” button, and click “NEXT” below after success. (Login the XHORSE account)

Xhorse Condor XC-MINI Plus II Use Guide: Installation / Activation / Calibration / Update

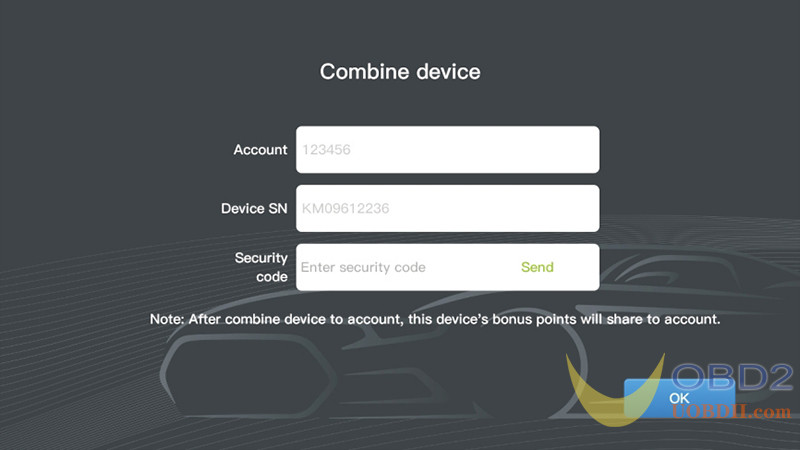
5)Users can choose account login or quick login (new users need to choose quick login and register)

Xhorse Condor XC-MINI Plus II Use Guide: Installation / Activation / Calibration / Update Xhorse Condor XC-MINI Plus II Use Guide: Installation / Activation / Calibration / Update

6)After logging in successfully, click “Send” to bind the device.

Xhorse Condor XC-MINI Plus II Use Guide: Installation / Activation / Calibration / Update

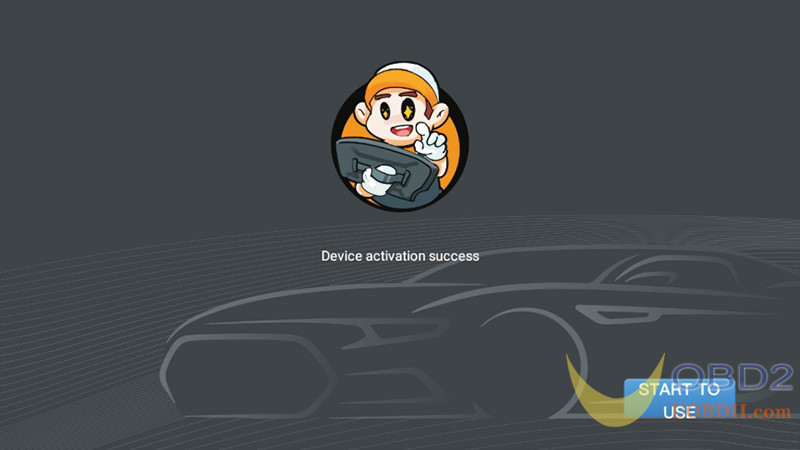
7)The device is successfully activated, click “START TO USE”.

Xhorse Condor XC-MINI Plus II Use Guide: Installation / Activation / Calibration / Update

Part 3. Calibration

This CONDOR II Machine adopts Android system, no need for “Height Calibration” and “Clamp Calibration”, just move the probe and the cutter to the top.

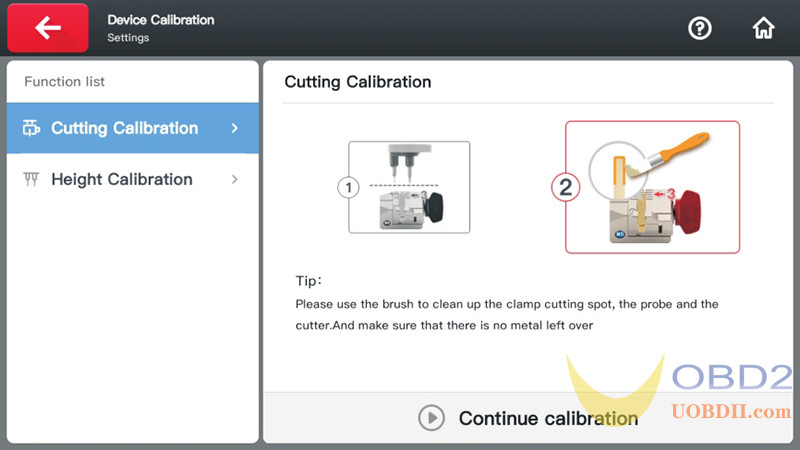
1)Enter the operation main interface and click on “Settings”.

Xhorse Condor XC-MINI Plus II Use Guide: Installation / Activation / Calibration / Update

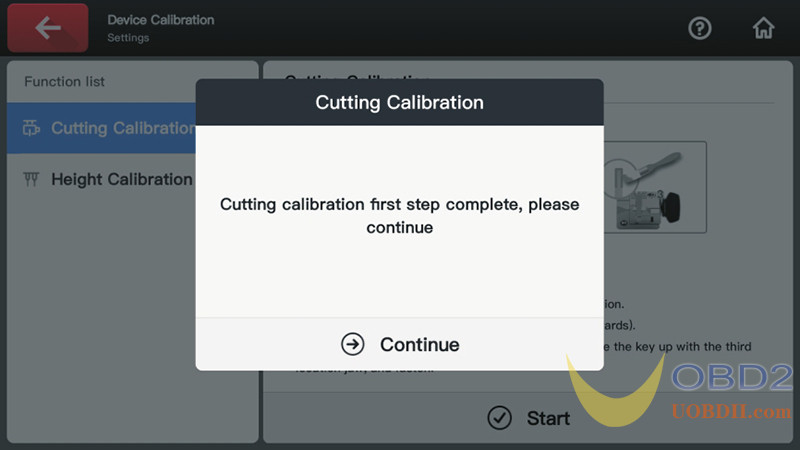
2)Click on “Cutting Calibration”.

Xhorse Condor XC-MINI Plus II Use Guide: Installation / Activation / Calibration / Update

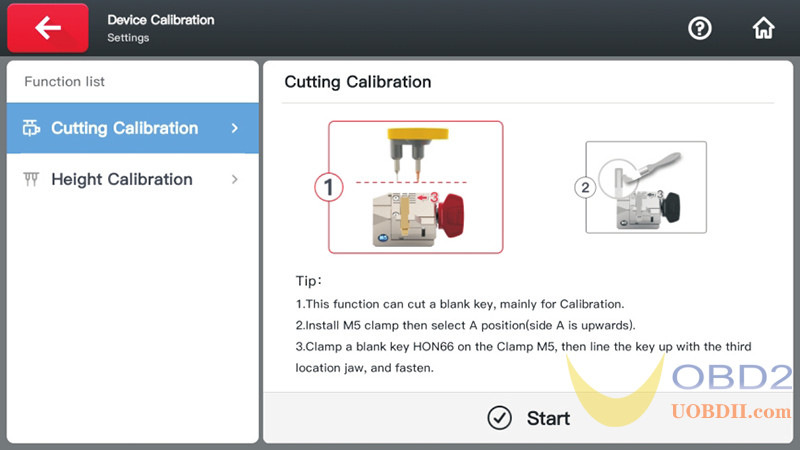
3)Operate by following the tips and click on “Continue”.

Xhorse Condor XC-MINI Plus II Use Guide: Installation / Activation / Calibration / Update

4)Clean the cutter and probe and working area with a brush. Click on “Continue calibration” and  now the calibration is finished.

Xhorse Condor XC-MINI Plus II Use Guide: Installation / Activation / Calibration / Update

Part 4. Update

Connect the machine to the Internet, click “Update” in the upper right corner of the main page.

Xhorse Condor XC-MINI Plus II Use Guide: Installation / Activation / Calibration / Update

Click the “UPDATE” button on the right to upgrade.

Xhorse Condor XC-MINI Plus II Use Guide: Installation / Activation / Calibration / Update

Download: Xhorse Condor XC-MINI Plus II User Manual

How useful was this post?

Click on a star to rate it!

Average rating / 5. Vote count:

This Post: Xhorse Condor XC-MINI Plus II Use Guide: Installation / Activation / Calibration / Update From ChinaOBD2 Official Blog
Please keep this link if you copy the post!

Post navigation

Prev: Prev: How to Solve 2020 Ford ABS Initial Configuration Not Completed by Launch X431 IMMO Plus
Next: Next: OBDSTAR P50 Airbag Reset Software V30.39 Update

Leave a Reply Cancel reply

Your email address will not be published. Required fields are marked *

Recent Posts

  • Caterpillar C9 Engine Coolant Level Signal Invalid Fault Code 12 111-2
  • chinaobd2.com Spring Festival Sale: Global Save Up to 50%
  • Allison 3000 & 4000 Gen5 Fault Code P070C Transmission Fluid Level Sensor Circuit Low
  • Allison 3000 & 4000 Gen5 Fault Code P070C Transmission Fluid Level Sensor Circuit Low
  • Doosan Machine Fault Code P060B ADC Test Error Solution

Recommend OBD2 Scanner

ME9.7 ECU Engine Computer ME9.7 ECU Engine Computer TabScan T6PT3G Diagnosis VCI for Porsche Diagnostic Tool Porsche Diagnostic Tool

Recent Comments

  • amr on MAN EOL Flash File Editor + MAN Immo Calculator Free Download
  • Pasquale Greenwald on Jungheinrich ETM/V 10-12 Tightening Torque for Screwed Connection on Brake Systems
  • VCDS on Scania SDP3 2.53.1 Diagnosis & Programming Free Download
  • Crossley on What are the functions of Iprog+ Programmer?
  • Lukas on VAG EDC15 EDC16 IMMO OFF Software Free Download

Archives

Categories

  • BMW Diagnostic Tool
  • Car Diagnostic Tool
  • Key Cutting Machine
  • Key Programming Tool
  • MB Star Diagnosis
  • OBD2 Code Scanner
  • Tech Support
  • VXDIAG

Tags

adapter Auto Pick and Decoder Car Key Copy Car Key Programmer cat Code Reader diagnostic software ECU Chip Tunning ecu programmer Ford gm handy baby Handy Baby 2 Key Programmer Handy Baby II Key Programmer HEX V2 immo iprog key Key Pro key programmer laptop Launch lish LISHI new arrivals nexiq nexiq link diesel truck interface nexiq truck diagnostic NEXIQ USB Link OBD2 obdii original program Scania VCI smart VAG COM Cable VCDS VCDS Cable VCDS VAG COM Cable vci VW wholesale X-PROG Box X-PROG Box ECU Programmer XPROG-M

Hot Selling

  • ME 9.7 ECU Engine Computer
  • MINI VCI J2534
  • NCF29XX Programmer
  • ThinkTool Pros+

Links

  • China OBD2
  • EPS Foam Machine
  • pcb assembly
©2025 OBD2 Scanner Blog | Powered by Superb Themes