Skip to content
Menu
OBD2 Scanner Blog
  • Home
  • Car Diagnostic Tool
    • MB Star Diagnosis
    • BMW Diagnostic Tool
    • GM Tech2
    • Volvo Vocom Interface
  • OBD2 Code Scanner
    • VXDIAG
  • Tech Support
OBD2 Scanner Blog

Replace Chassis Module Primary/Chassis Module Secondary for Paccar Kenworth 2.1M

Posted on April 4, 2023 by
Chassis-Module-PrimaryChassis-Module-Secondary-for-Paccar-Kenworth-2.1M

This procedure is a walk-through on replacing a CMP or CMS on a Kenworth 2.1M cab.More topics about Paccar truck,please refer to:PACCAR Truck Repair.


Related Content:

Paccar ESA Electronic Service Analyst v5.4.3 v5.2.2 Free Download


Procedures:

1.Disconnect the negative battery cable.

2.Locate the module being replaced.

The CMP and CMS are located behind the left forward cab mount.

Chassis-Module-PrimaryChassis-Module-Secondary-for-Paccar-Kenworth-2.1M

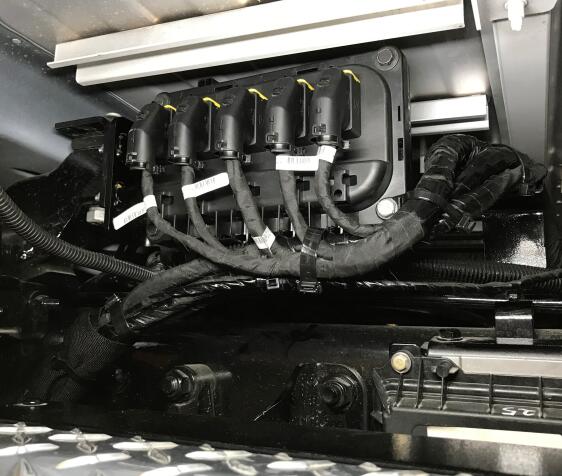
3.Disconnect the 5 harness connectors from the CMP.

4.Remove the 2 nuts securing the Chassis Module bracket to the cab mount.

5.If the truck is equipped with a CMS lay the assembly down, unplug the 5 harness connectors from the CMS, and remove the assembly from the truck.

6.Remove the 4 bolts and nuts holding the Chassis Modules to the Chassis Module Bracket.

7.Install the desired module using the original 4 bolts and nuts.

8.If the truck is equipped with a CMS, plug the 5 harness connectors into the CMS.

9.Secure the assembly to the cab mount using the original 2 nuts.

10.Plug the 5 harness connectors into the CMP.

11.Reconnect the negative battery cable.

12.Access PVP through ePortal, put in the last 8 of the VIN and click Search.

13.Click

How useful was this post?

Click on a star to rate it!

Average rating / 5. Vote count:

This Post: Replace Chassis Module Primary/Chassis Module Secondary for Paccar Kenworth 2.1M From ChinaOBD2 Official Blog
Please keep this link if you copy the post!

Post navigation

Prev: Prev: How to Change Muffler Filter Number by MPDr Diagnostic Software
Next: Next: How to Update BMW EVO Navigation from ID5 to ID6 Interface

Leave a Reply Cancel reply

Your email address will not be published. Required fields are marked *

Recent Posts

  • Caterpillar C9 Engine Coolant Level Signal Invalid Fault Code 12 111-2
  • chinaobd2.com Spring Festival Sale: Global Save Up to 50%
  • Allison 3000 & 4000 Gen5 Fault Code P070C Transmission Fluid Level Sensor Circuit Low
  • Allison 3000 & 4000 Gen5 Fault Code P070C Transmission Fluid Level Sensor Circuit Low
  • Doosan Machine Fault Code P060B ADC Test Error Solution

Recommend OBD2 Scanner

ME9.7 ECU Engine Computer ME9.7 ECU Engine Computer TabScan T6PT3G Diagnosis VCI for Porsche Diagnostic Tool Porsche Diagnostic Tool

Recent Comments

  • amr on MAN EOL Flash File Editor + MAN Immo Calculator Free Download
  • Pasquale Greenwald on Jungheinrich ETM/V 10-12 Tightening Torque for Screwed Connection on Brake Systems
  • VCDS on Scania SDP3 2.53.1 Diagnosis & Programming Free Download
  • Crossley on What are the functions of Iprog+ Programmer?
  • Lukas on VAG EDC15 EDC16 IMMO OFF Software Free Download

Archives

Categories

  • BMW Diagnostic Tool
  • Car Diagnostic Tool
  • Key Cutting Machine
  • Key Programming Tool
  • MB Star Diagnosis
  • OBD2 Code Scanner
  • Tech Support
  • VXDIAG

Tags

adapter Auto Pick and Decoder Car Key Copy Car Key Programmer cat Code Reader diagnostic software ECU Chip Tunning ecu programmer Ford gm handy baby Handy Baby 2 Key Programmer Handy Baby II Key Programmer HEX V2 immo iprog key Key Pro key programmer laptop Launch lish LISHI new arrivals nexiq nexiq link diesel truck interface nexiq truck diagnostic NEXIQ USB Link OBD2 obdii original program Scania VCI smart VAG COM Cable VCDS VCDS Cable VCDS VAG COM Cable vci VW wholesale X-PROG Box X-PROG Box ECU Programmer XPROG-M

Hot Selling

  • ME 9.7 ECU Engine Computer
  • MINI VCI J2534
  • NCF29XX Programmer
  • ThinkTool Pros+

Links

  • China OBD2
  • EPS Foam Machine
  • pcb assembly
©2025 OBD2 Scanner Blog | Powered by Superb Themes