Diagzone Xdiag Subscription Renew, LAUNCH LTR-01 RF Sensor, Thinkdiag Renew , Scania SDP3 Installation
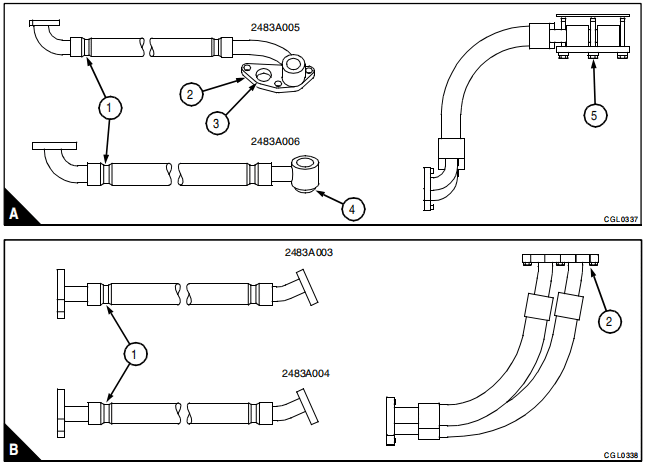
New improved oil cooler pipes have been introduced on 6 cylinder Phaser/1000 Series engines. The new pipes do not have metal braid and are separate pipes. The part number of the pipes is stamped on a clip which is fastened to one end of each pipe (A1 and B1 on page 2). There are two arrangements for the pipes which are used in accordance with the application.
Related Contents:
Perkins EST 2024A & 2023A & 2019A Software Free Download
Perkins SPI2 2018A EPC+Service Manual Free Download
Arrangement 1
The part numbers of the components affected are listed below:

Note: There is no change to the joints.
Arrangement 2
The part numbers of the components affected are listed below:

Note: There is no change to the setscrews or to the joints.
To fit the pipes (arrangement 1)
1 Put the three setscrews in position in the flange (A2) of the pipe, part number 2483A005. Put a new joint in position on the setscrews.
2 Engage the setscrews by three or four threads in the flange of the oil cooler. Engage the spigot (A4) of pipe,part number 2483A006, in the hole (A3) in the flange (A2) of the first pipe, ensure that it fits squarely in the flange.
3 Support the pipes by hand and tighten the centre setscrew (A5) finger tight. Tighten the other setscrews until they are finger tight. Ensure that the pipes are as close together as possible, then tighten the setscrews gradually and evenly to 22 Nm (16 lbf ft) 2,2 kgf m.
4 Put a setscrew in position in the flange of the inner pipe for the oil filter head. Put a new joint in position on the setscrew. Hold the flange and the joint in position and fit the centre setscrew. Tighten the setscrews finger tight. Put the flange of the outer pipe in position and fit the third setscrew, tighten it finger tight. Beginning with the centre setscrew, tighten the three setscrews to 22 Nm (16 lbf ft) 2,2 kgf m.
To fit the pipes (arrangement 2)
1 Put a setscrew in position in the flange (B2) for the oil cooler of pipe, part number 2483A004. Put a new joint in position on the setscrew. Hold the flange and the joint in position and fit the centre setscrew. Tighten the setscrews finger tight. Put the pipe, part number 2483A003, in position on the flange of the oil cooler and fit the third setscrew finger tight. Beginning with the centre setscrew, tighten the three setscrews to 22 Nm (16 lbf ft) 2,2 kgf m.
2 Put a setscrew in position in the flange of the inner pipe for the oil filter head. Put a new joint in position on the setscrew. Hold the flange and the joint in position and fit the centre setscrew. Tighten the setscrew finger tight. Put the flange of the outer pipe in position and fit the third setscrew, tighten it finger tight. Beginning with the centre setscrew, tighten the three setscrews to 22 Nm (16 lbf ft) 2,2 kgf m.
Note: The new pipe arrangements are not interchangeable
More trouble repair case for Perkins,pls refer to:Perkins Trouble Repair
How useful was this post?
Click on a star to rate it!
Average rating / 5. Vote count:

Some Friends don't know how to activate win7, when they receive the diagnostic software with win7 sytem. http://www.chinaobd2.com/upload/software/win7activation.zip download this Read more

Please ensure that you choose computer systems that meet our requirements for the installation. You will find adetailed listing in Read more

Frequent oil changes are perhaps the most important procedure you can do to maintain and prolong the life of your Read more

This article show a guide on how to use G-scan2
Please keep this link if you copy the post!