Diagzone Xdiag Subscription Renew, LAUNCH LTR-01 RF Sensor, Thinkdiag Renew , Scania SDP3 Installation
This instruction show you guide on how to remove and install turbocharger for Perkins 400A and 400D industrial engines.
Related Contents:
Newest Perkins EST 2020A & 2019A Full Support Free Download
Perkins SPI2 2018A EPC+Service Manual Free Download
Removal procedure
NOTICE:Care must be taken to ensure that fluids are contained during performance of inspection, maintenance,testing, adjusting and repair of the product.
Be prepared to collect the fluid with suitable containers before opening any compartment or disassembling any component containing fluids.
Dispose of all fluids according to local regulations and mandates.
Keep all parts clean from contaminants.
Contaminants may cause rapid wear and shortened component life.
Note: Plug and cap all open ports and tube assemblies.
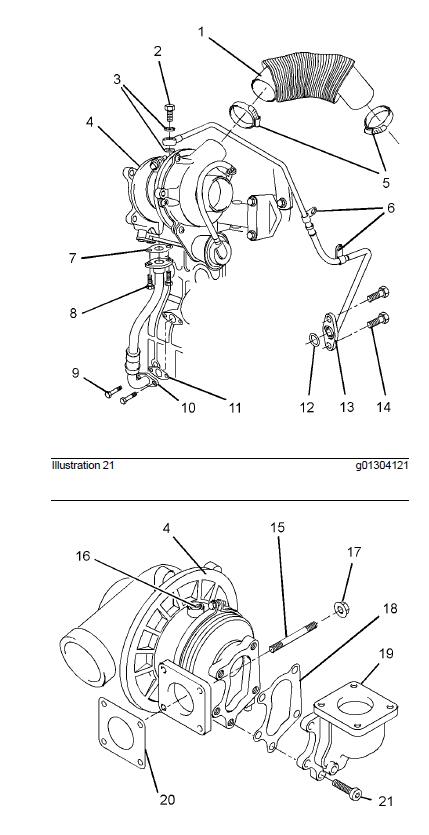
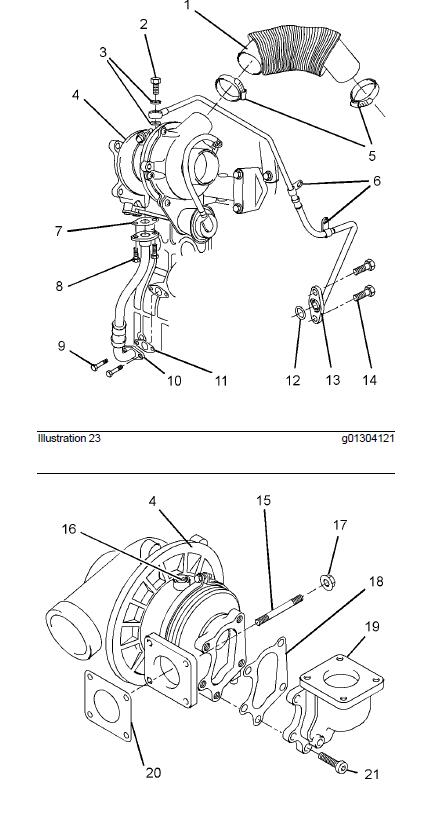
1.Loosen hose clamps (5) and remove air inlet hose (1).
2.Remove allen head screws (21) and remove exhaust elbow (19) from turbocharger (4). Remove gasket (18) from the turbocharger.
3.Remove banjo bolt (2) and washers (3). Remove the fasteners and the spacers (not shown) for tube clips (6). Remove bolts (14) and remove tube assembly (13) from the cylinder block. Remove Oring seal (12).
4.Remove bolts (8) and disconnect tube assembly (10) from the turbocharger. Remove joint (7). If necessary, remove bolts (9) and remove tube assembly (10) from the cylinder block. Remove joint (11).
5.Remove nuts (17) and remove turbocharger (4) from the exhaust manifold. Remove gasket (20) from the exhaust manifold. If necessary, remove studs (15) from the exhaust manifold.
Note: Do not use the actuator rod of the wastegate to lift the turbocharger.
Installation procedure
NOTICE
Keep all parts clean from contaminants.Contaminants may cause rapid wear and shortened
component life.
1Ensure that the turbocharger is clean and free from damage. Inspect the turbocharger for wear. If the turbocharger is worn, the complete turbocharger must be replaced.
2.Test the actuator for correct operation.If the actuator is damaged or the actuator does not operate within the specified limits, the complete turbocharger must be replaced.
3.Clean the mating surfaces of the exhaust manifold.If necessary, install studs (15) to the exhaust manifold. Tighten the studs to a torque of 18 N
How useful was this post?
Click on a star to rate it!
Average rating / 5. Vote count:

Some Friends don't know how to activate win7, when they receive the diagnostic software with win7 sytem. http://www.chinaobd2.com/upload/software/win7activation.zip download this Read more

Please ensure that you choose computer systems that meet our requirements for the installation. You will find adetailed listing in Read more

Frequent oil changes are perhaps the most important procedure you can do to maintain and prolong the life of your Read more

Please keep this link if you copy the post!