Diagzone Xdiag Subscription Renew, LAUNCH LTR-01 RF Sensor, Thinkdiag Renew , Scania SDP3 Installation
This instruction show you guide on how to remove and install inlet and exhaust valve springs for Perkins 400A/400D engine.
Preparations:
Perkins EST 2024A & 2023A & 2019A Software Free Download
Perkins SPI2 2018A EPC+Service Manual Free Download
Perkins Communication Adapter 3
Remove Procedures:
Note: The removal procedure is similar for the two cylinder, the three cylinder and the four cylinder
engines. The following procedure should be adopted to remove the valve springs when the cylinder head is installed to the engine. Refer to Disassembly and Assembly, “Inlet and Exhaust Valves – Remove and Install” for the procedure to remove the valve springs from a cylinder head that has been removed from the engine.
Note: Ensure that the appropriate piston is at the top center position before the valve spring is removed.
Failure to ensure that the piston is at the top center position may allow the valve to drop into the cylinder bore.
Follow Steps 1.a through 1.d to position the appropriate piston at top center.
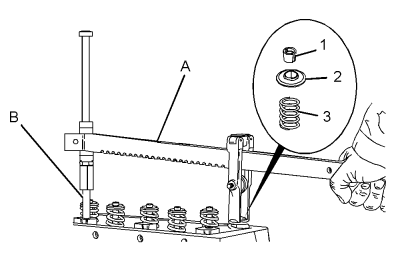
a. Install Tooling (A) and (B) in position on the cylinder head to compress a valve spring for the
appropriate piston.
b. Use Tooling (A) to compress valve spring (3) and open the valve slightly.
Note: Do not compress the spring so that the valve spring retainer (2) touches the valve stem seal.
c. Carefully rotate the crankshaft until the piston touches the valve.
Note: Do not use excessive force to turn the crankshaft. The use of force can result in bent
valve stems.
d. Continue to rotate the crankshaft and gradually release the pressure on Tooling (A) until the
piston is at the top center position. The valve is now held in a position that allows the valve
spring to be safely removed.
Use tool (A) to compress valve spring (3). Remove valve keepers (1).
Note: For four cylinder engines, if all valve springs require replacement the procedure can be carried out on two cylinders at the same time. The procedure can be carried out on the following pairs of cylinders.1 with 4 and 2 with 3. Ensure that all the valve springs are installed before changing from one pair of cylinders to another pair of cylinders.
Apply sufficient pressure to Tooling (A) to allow removal of the valve keepers (1).
Note: Do not compress the spring so that the valve spring retainer (2) touches the valve stem seal.
Remove valve keepers (1).
4. Slowly release the pressure on Tooling (A).
5. Remove valve spring retainer (2) and remove valve spring (3).
6. Remove Tooling (A) and (B).
Installation Procedure
Inspect the valve springs for the correct length.
Refer to Specifications, “Cylinder Head Valves”.
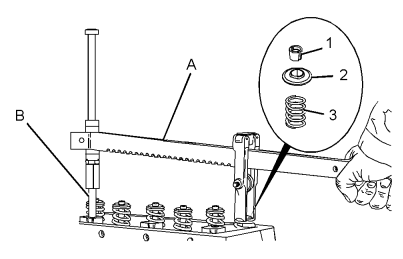
Install valve spring (3) onto the cylinder head. Position valve spring retainer (2) onto valve spring
(3).
Install Tooling (A) and (B) in the appropriate position on the cylinder head to compress the
valve spring.
4. Apply sufficient pressure to Tooling (A) to install valve keepers (1).
Note: Do not compress the spring so that valve spring retainer (2) touches the valve stem seal. Install the valve spring keepers.
5. Carefully release the pressure on Tooling (A).
Note: Ensure that the valve keepers are correctly seated.
Remove Tooling (A). Ensure that all the valves are secured in place by a valve spring and valve
keepers. Rotate the crankshaft through about 45 degrees to clear the piston from the valve. Lightly
strike the top of the valve with a soft hammer to ensure that the valve keepers are properly installed.
More trouble repair case for Perkins,pls refer to:Perkins Trouble Repair
How useful was this post?
Click on a star to rate it!
Average rating / 5. Vote count:

Some Friends don't know how to activate win7, when they receive the diagnostic software with win7 sytem. http://www.chinaobd2.com/upload/software/win7activation.zip download this Read more

Please ensure that you choose computer systems that meet our requirements for the installation. You will find adetailed listing in Read more

Frequent oil changes are perhaps the most important procedure you can do to maintain and prolong the life of your Read more

This article show a guide on how to use G-scan2
Please keep this link if you copy the post!