Diagzone Xdiag Subscription Renew, LAUNCH LTR-01 RF Sensor, Thinkdiag Renew , Scania SDP3 Installation
The information in this Service Bulletin warns of the possibility for cracks to appear around the spot welds on the grain plate of the lower cleaning shoe. Over time these cracks can grow into a hole which would then allow clean grain to pass directly into the returns system.
Preparations:
2023 CNH EST 9.9 9.2New Holland Diagnostic Software Free Download
CNH DPA5 Diagnostic Kit
CNH eTimGo Offline
The cracks around the spot welds fail as a result of excessive flexibility on the grain plate.
To overcome this concern on production units,NEW HOLLAND introduced a new lower cleaning shoe. The new lower cleaning shoe has three support profiles instead of the previous two support profiles. There is also an improved stiffness to the transition where the grain plate connects to the lower shoe frame on the front side of the lower cleaning shoe.
These two changes provide:
The room for a double row of spot welds at the front of the grain plate
Increased stiffness of the grain plate
To overcome this concern on service units built prior to the production series 1985, NEW HOLLAND introduced a lower shoe repair kit 48194177. This repair kit avoids the need to replace a complete lower shoe if the grain plate sustains damaged.
The repair kit provides the necessary parts:
To repair a damaged grain plate
AND
For the addition of the reinforcement profile to improve the stiffness of the grain plate
To install the repair kit refer to the below service instructions.
ACTION
PRODUCTION
The new lower shoe is effective from product identification number: xx1985001 onward.
SERVICE
Unit preparation
NOTE: The four reference points to the unit are the left-hand side, the right-hand side, the front of the unit, and the back of the unit. These reference points apply to someone that faces the direction of travel from a standing position that is behind the unit.
WARNING
Avoid injury!
Before you start any work on the unit, prepare the unit according to the following instructions.
Failure to comply could result in death or serious injury.
Thoroughly clean the area on the unit that pertains to the service instructions for this Service Bulletin.
Park the unit on a hard, level surface.
Apply the parking brake.
Completely lower any attachments to the ground.
Relieve all of the hydraulic system pressure.
Shut down the engine.
Remove the ignition key.
Turn the battery disconnect switch to the OFF position.
Follow any specific instructions that pertain to the unit within the service instructions as necessary.
Service instruction
Lower shoe grain plate repair kit installation instructions:
1 Remove the upper sieves.
2 Remove the lower sieves.
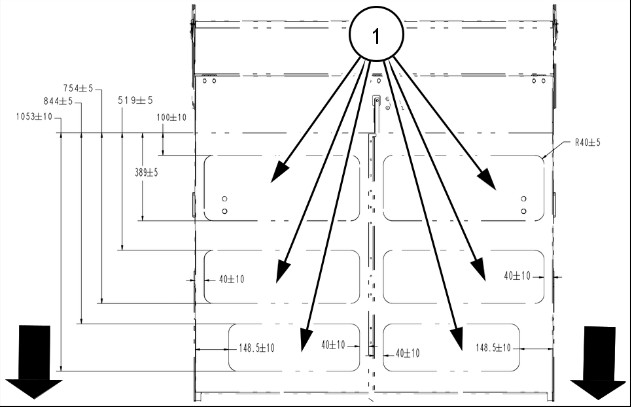
3 Mark-out the areas (1) on the failed grain plate, as Figure 1 depicts.
NOTE: The arrows depict the front of the machine.
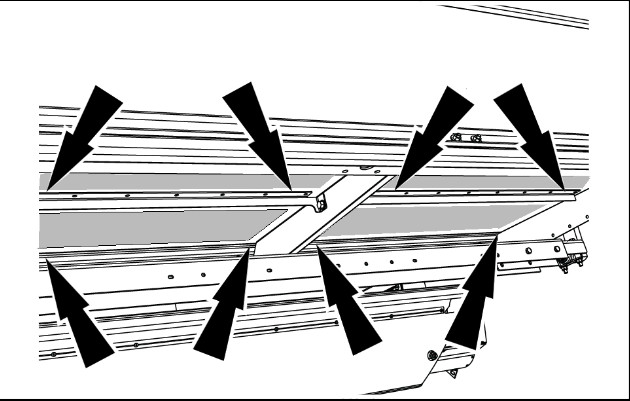
4 Cut out the areas (1) from the failed grain plate, as Figure 2 depicts.
NOTE: The corners of the rectangular sections must have a radius of 40mm. The corners cannot be square as a crack would emanate from the corner.
NOTE: The arrows depict the front of the machine.
5 Before you install the new grain plate, check that there is no clearance between the support profiles and the existing grain plate.
NOTE: If there is a gap, clamp the profile and the remains of the existing grain plate together and weld where necessary.
Installation of the repair plates at the rear of the grain plate:
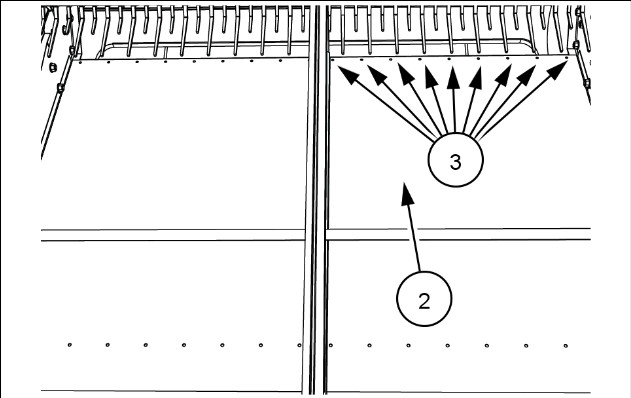
6 Install the right-hand side repair plate 48194252 (2) on the right-hand side of the lower shoe grain plate.
7 Align the right-hand side repair plate correctly.
8 Drill nine 6.5?mm holes through the existing grain plate.
NOTE: Use the right-hand side repair plate 48194252 as a template.
9 Install nine rivets 84462757 (3) into the drilled holes.
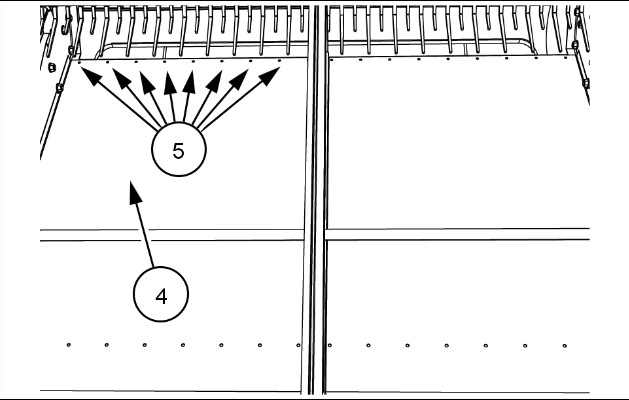
10 Install the left-hand side repair plate 51408117 (4) on the left-hand side of the lower shoe grain plate.
11 Align the left-hand side repair plate correctly.
12 Drill nine 6.5?mm (5) holes through the existing grain plate.
NOTE: Use the left-hand side repair plate 51408117 as a template.
13 Install nine rivets 84462757 into the drilled holes.
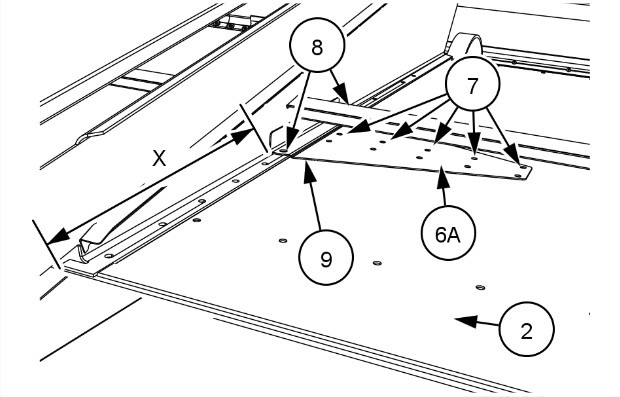
On the right hand side of the center support:
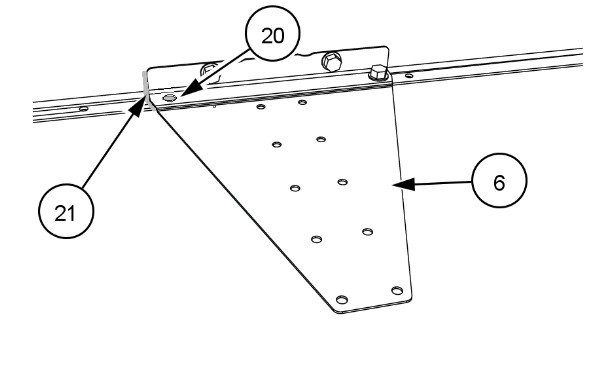
14 Align reinforcement bracket 48142167 (6A) 365?mm (14.37?in) from the rear edge of the right-hand repair plate (2).
NOTE: With the reinforcement bracket (6A) in the above position, the rivet holes (7) in the reinforcement bracket will align with the profile beneath the grain plate.
15 Drill two 9?mm holes (8) vertically through the grain plate.
NOTE: Use the reinforcement bracket (6A) as the template to drill the holes.
16 Position the shim plate 51408122 (9) in the gap under the reinforcement bracket (6A).
17 Install the M8x20 hardware (10) into the holes (8).
NOTE: Do not tighten the hardware at this time.
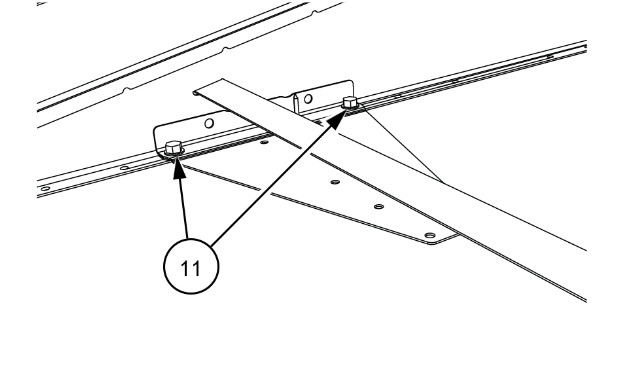
18 Drill two 9?mm (11) holes horizontally through the center support plate of the lower shoe.
NOTE: Use the reinforcement bracket (6A) as the template to drill the holes.
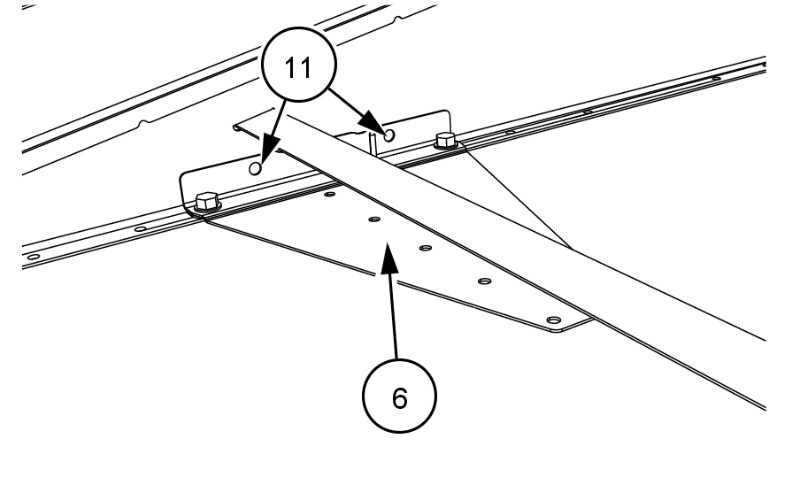
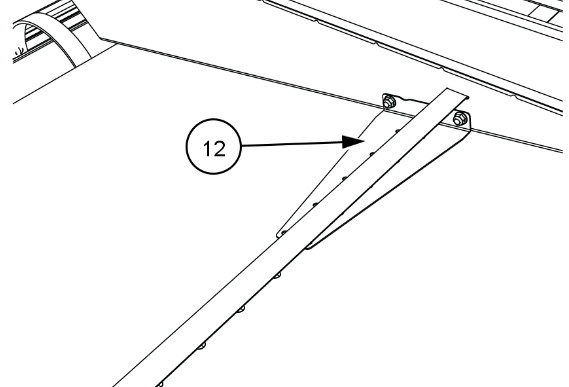
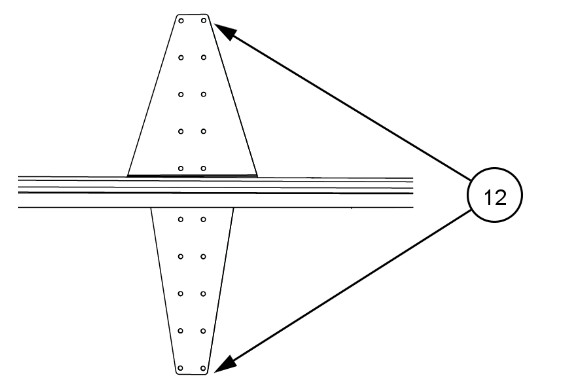
19 Install plate 48142165 (12) to the left-hand side of the center support on the lower shoe.
NOTE: Align the plate with the pre-drilled holes from Step 18.
20 Use hardware 86511841 and 86619801 to secure the plate (11) to the plate (6A).
21 Tighten the above hardware.
22 14. Tighten the hardware (11) on the right-hand side of the lower shoe. See Step 17.
23 Drill twenty 6.5?mm holes through the existing grain plate.
NOTE: Use the left-hand side reinforcement bracket and the right-hand side reinforcement bracket as a template.
24 Install twenty rivets 84462757 into the drilled holes.
NOTE: The two reinforcement brackets on the right-hand side of the lower shoe are identical.
The two reinforcement brackets on the left-hand side of the lower shoe are identical.
Installation of the reinforcement brackets at the front of the grain plate
On the right hand side of the center support:
25 Align right-hand reinforcement bracket 48142167 (6B) 325?mm (12.8?in) from the rear edge of the right-hand reinforcement bracket (2).
26 Drill one 9?mm hole (12) vertically through the grain plate.
NOTE: Use the reinforcement bracket (6B) as the template to drill the hole.
NOTE: Do not drill the second vertical hole at the rear edge of the reinforcement bracket (6B). You will plug weld the second hole in the repair plate later in the instruction.
27 Continue with the above Steps 16 to 22
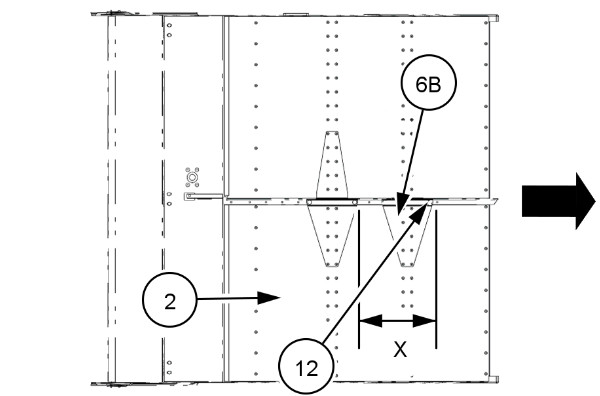
28 Mark-out the 64 holes as Figure 12 depicts:
How useful was this post?
Click on a star to rate it!
Average rating / 5. Vote count:

Some Friends don't know how to activate win7, when they receive the diagnostic software with win7 sytem. http://www.chinaobd2.com/upload/software/win7activation.zip download this Read more

Please ensure that you choose computer systems that meet our requirements for the installation. You will find adetailed listing in Read more

Frequent oil changes are perhaps the most important procedure you can do to maintain and prolong the life of your Read more

Please keep this link if you copy the post!