Skip to content
Menu
OBD2 Scanner Blog
  • Home
  • Car Diagnostic Tool
    • MB Star Diagnosis
    • BMW Diagnostic Tool
    • GM Tech2
    • Volvo Vocom Interface
  • OBD2 Code Scanner
    • VXDIAG
  • Tech Support
OBD2 Scanner Blog

JCB 3CX Backhoe Loader Side Console Removal and Replacement Guide

Posted on April 3, 2023 by
JCB-3CX-Backhoe-Loader-Side-Console-Removal-and-Replacement-Guide-2

Diagzone Xdiag Subscription Renew, LAUNCH LTR-01 RF Sensor, Thinkdiag Renew , Scania SDP3 Installation

This instruction show you guide on how to remove and replace side console for JCB 3CX,4CX,214e,214,215,217 & VARIANTS.


Related Contents:

2017 JCB Parts Plus+ and Repair Service Manual Free Download

2022 JCB ServiceMaster 4 Free Download for Win 7/Win 8/Win 10


Removal

1 Park the machine on firm level ground, apply the parking brake. Lower the loader arms and excavator to the ground, switch OFF the engine and remove the starter key.

2

Disconnect the battery.

3 Working in the cab, remove the fixing A at the top of the instrument panel and carefully lift the panel forward to reveal the connections at the back as shown.

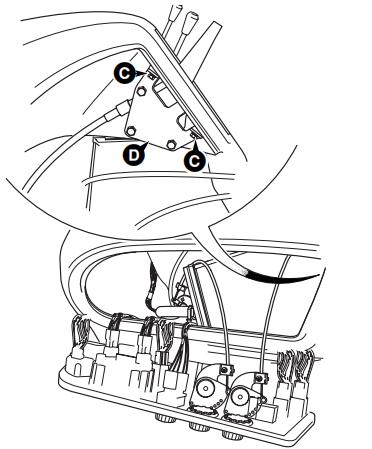
4 Disconnect the electrical connectors and heater controls cables at the rear of the instrument panel, then remove the instrument panel assembly clear of the side console. Label the connectors and controls cables before disconnecting to ensure correct replacement.

5 Remove the hand throttle lever knob B, remove the screws C from the hand throttle lever and mounting bracket assembly D inside the side console as shown.

Withdraw the handle through the slot in the panel.

6 Remove the screws from around the base of the stabiliser control levers E, carefully withdraw the lever assembly from the side console and disconnect the control cables from the underside. Label each control cable before disconnecting to ensure correct replacement.

JCB-3CX-Backhoe-Loader-Side-Console-Removal-and-Replacement-Guide-1

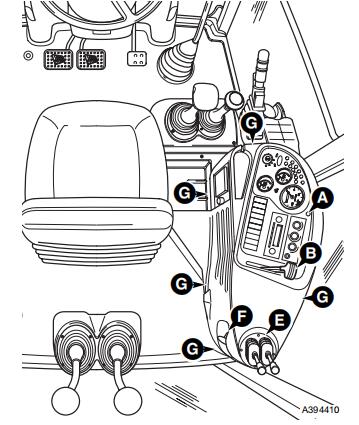
7 Unscrew the knob and lock nut from the boom lock control F.

8 Remove the fixings G (5 off) securing the side console panel at positions shown. Carefully lift up the rear corner of the side panel over the boom lock control outer sleeve, and then lift the side panel clear.

JCB-3CX-Backhoe-Loader-Side-Console-Removal-and-Replacement-Guide-2


Replacement

Replacement is the reverse of the removal sequence.

Take care when removing/replacing the console panel to ensure that harnesses do not become snagged and that no other connections have been disturbed.

After re-fitting, operate the side console controls and check they all function correctly.

(Visited 126 times, 1 visits today)

How useful was this post?

Click on a star to rate it!

Average rating / 5. Vote count:

Related Posts
How to Activate Windows 7 without Product Key |Windows is Not Genuine
JCB 3CX Backhoe Loader Side Console Removal and Replacement Guide

Some Friends don't know how to activate win7, when they receive the diagnostic software with win7 sytem. http://www.chinaobd2.com/upload/software/win7activation.zip download this Read more

How to Install Original Mercedes BENZ EPC/WIS/ASRA net |China OBD2 Store
JCB 3CX Backhoe Loader Side Console Removal and Replacement Guide

Please ensure that you choose computer systems that meet our requirements for the installation. You will find adetailed listing in Read more

How to Replace Benz W204 Engine Oil Filter
JCB 3CX Backhoe Loader Side Console Removal and Replacement Guide

Frequent oil changes are perhaps the most important procedure you can do to maintain and prolong the life of your Read more

Mini R56 Misfire Abnormal Vibration Diagnosis & Repair by G-scan2
JCB 3CX Backhoe Loader Side Console Removal and Replacement Guide

This article show a guide on how to use G-scan2

This Post: JCB 3CX Backhoe Loader Side Console Removal and Replacement Guide From ChinaOBD2 Official Blog
Please keep this link if you copy the post!

Post navigation

Prev: Prev: Linde T20APHP Forklift Truck Accelerator Assy Replacement Guide
Next: Next: RSSPLUS TRAILER Wheel Speed Sensor Removal & Installation Guide

Leave a Reply Cancel reply

Your email address will not be published. Required fields are marked *

Recent Posts

  • How to Remove and Replace Cab Heater Controls for JCB 3CX Loader
  • How to Remove Differential Gear for FENDT 900 Vario COMIII
  • Quick Tips to Use Xhorse BMW G Series BDC2 Adapter
  • International MaxxForce 7 SPN 27 FMI 4 EGRP Signal Out of Range Low
  • Detroit DD13 SPN 84 FMI 3 MCM Vehicle Speed Sensor Open Circuit

Recommend OBD2 Scanner

ME9.7 ECU Engine Computer ME9.7 ECU Engine ComputerTabScan T6PT3G Diagnosis VCI for Porsche Diagnostic Tool Porsche Diagnostic Tool

Recent Comments

  • VCDS on Scania SDP3 2.59.1 free download Scania Diagnosis & Programming 3 download link
  • Glynn McKay on Scania SDP3 2.59.1 free download Scania Diagnosis & Programming 3 download link
  • jakub brosz on Scania SDP3 V2.64.3 Download link
  • amr on MAN EOL Flash File Editor + MAN Immo Calculator Free Download
  • Pasquale Greenwald on Jungheinrich ETM/V 10-12 Tightening Torque for Screwed Connection on Brake Systems

Archives

Categories

  • BMW Diagnostic Tool
  • Car Diagnostic Tool
  • Key Cutting Machine
  • Key Programming Tool
  • MB Star Diagnosis
  • OBD2 Code Scanner
  • Tech Support
  • VXDIAG

Tags

adapter Auto Pick and Decoder Car Key Copy Car Key Programmer cat Code Reader diagnostic software ECU Chip Tunning ecu programmer Ford gm handy baby Handy Baby 2 Key Programmer Handy Baby II Key Programmer HEX V2 immo iprog key Key Pro key programmer laptop Launch lish LISHI new arrivals nexiq nexiq link diesel truck interface nexiq truck diagnostic NEXIQ USB Link OBD2 obdii original program Scania VCI smart VAG COM Cable VCDS VCDS Cable VCDS VAG COM Cable vci VW wholesale X-PROG Box X-PROG Box ECU Programmer XPROG-M

Hot Selling

  • Launch CRP129 HD
  • ME 9.7 ECU Engine Computer
  • MINI VCI J2534
  • NCF29XX Programmer

Links

  • BOBD2 Auto Diagnostic Tools Market
  • China OBD2
  • EPS Foam Machine
  • Foxdiag
  • Сканер OBD2
©2025 OBD2 Scanner Blog | Powered by chinaobd2