Skip to content
Menu
OBD2 Scanner Blog
  • Home
  • Car Diagnostic Tool
    • MB Star Diagnosis
    • BMW Diagnostic Tool
    • GM Tech2
    • Volvo Vocom Interface
  • OBD2 Code Scanner
    • VXDIAG
  • Tech Support
OBD2 Scanner Blog

ISUZU N Series Truck with 4JJ1 Engine Injector Removal and Installation Guide

Posted on April 3, 2023 by
ISUZU-N-Series-Truck-with-4JJ1-Engine-Injector-Removal-and-Installation-Guide-9

Diagzone Xdiag Subscription Renew, LAUNCH LTR-01 RF Sensor, Thinkdiag Renew , Scania SDP3 Installation

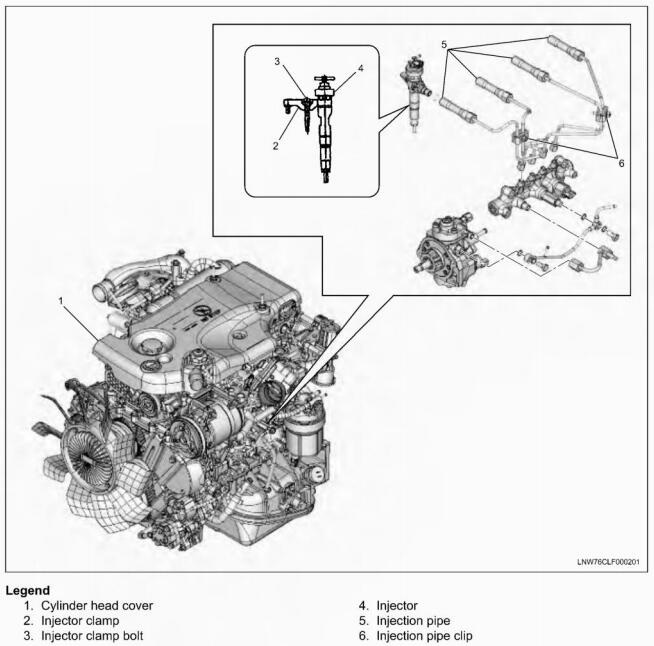
This instruction show you guide on how to remove and install injector for ISUZU N series truck with 4JJ1 engine Euro 4.

ISUZU-N-Series-Truck-with-4JJ1-Engine-Injector-Removal-and-Installation-Guide-1

Related Contents:

2022 2019 Isuzu G-IDSS Diagnostic Software Free Download (Troubleshooting Guide Included)

ISUZU IDSS Diagnostic Adapter(Support Programming/Flashing)


Procedures:

Including the inside of the injector, the holes and gaps that are the fuel paths for the fuel system have anextremely precise finish. Therefore, because there is the possibility of damage if foreign material becomes mixed in, cover the cap after removing parts, etc. to prevent the entry of foreign material.


Removal

1.Remove the cylinder head cover.

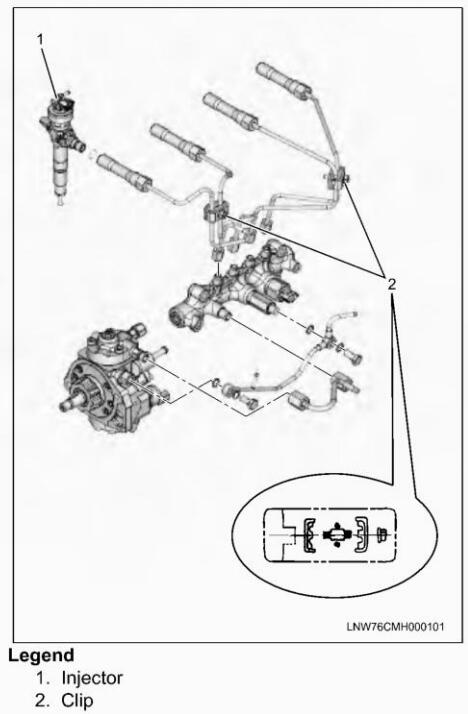
2.Remove the sleeve nut(1) of the injection pipe from the injector.

NOTE: Do not reuse the injection pipe.

ISUZU-N-Series-Truck-with-4JJ1-Engine-Injector-Removal-and-Installation-Guide-2

3.Remove the injector.

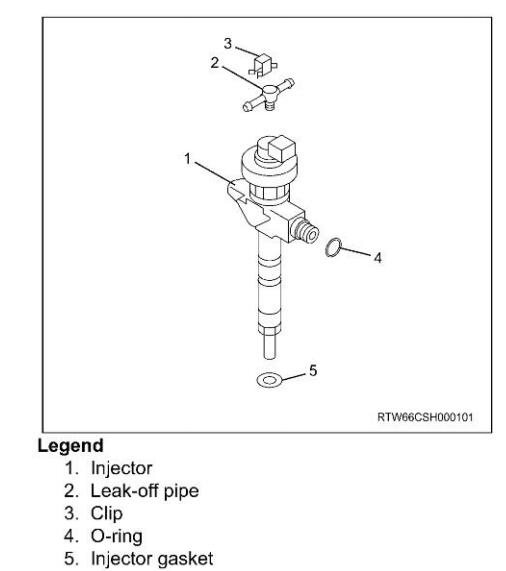
NOTE: Do not reuse the clip, injector gasket and O-ring.

ISUZU-N-Series-Truck-with-4JJ1-Engine-Injector-Removal-and-Installation-Guide-3

NOTE:

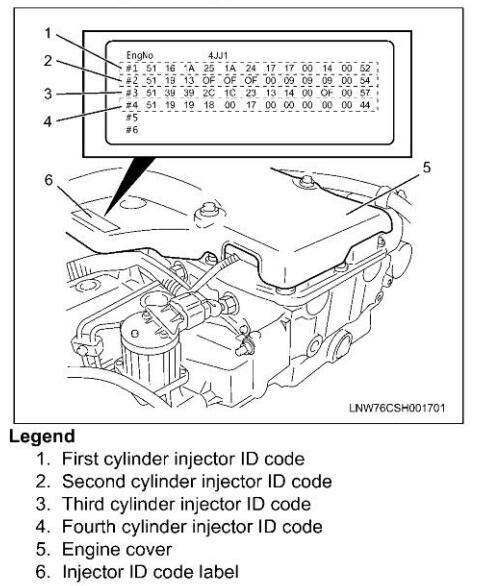
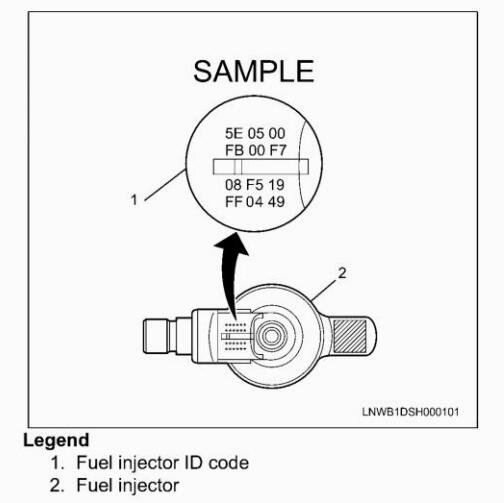
The injector ID code identifies the injectors.Do not remove the injector ID codes from the injectors.

Absolutely never touch the injector solenoids because that can hinder their performance or cause damage.

Store the removed injector with the cylinder number on it.

When you replace the injector, use a black pen, etc. to erase the ID code of the replaced cylinder number on the injector ID code label (6) attached to the engine cover(5).

ISUZU-N-Series-Truck-with-4JJ1-Engine-Injector-Removal-and-Installation-Guide-4


Installation

1.Install the O-ring to the injector.

NOTE:

Apply engine oil to the O-ring when installing and take care not to damage it.

Do not reuse the O-ring.

2.Install the injector gasket to the cylinder head.

NOTE:

Clean any foreign material or dirt from the cylinder head and injector before assembling the injector gasket.

Do not forcibly push the injector gasket into the injector as it will be pushed until it hits the end of the injector during clamp tightening.

Do not reuse the clip and injector gasket.

ISUZU-N-Series-Truck-with-4JJ1-Engine-Injector-Removal-and-Installation-Guide-5


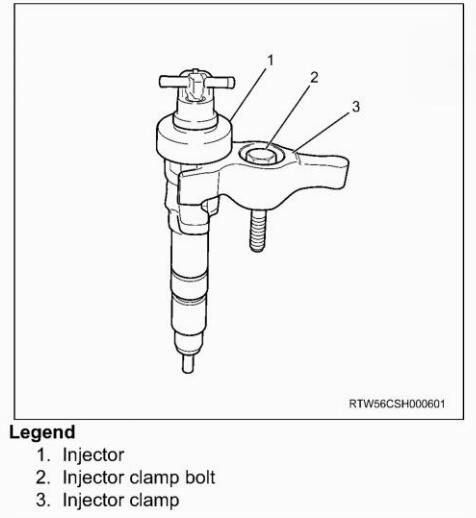
3.Install the injector clamp as indicated in the diagram.

Apply engine oil to the threaded portion and seat surface of the injector clamp bolt.

ISUZU-N-Series-Truck-with-4JJ1-Engine-Injector-Removal-and-Installation-Guide-6

NOTE: Do not reuse the clip, gasket or O-ring.

4.Install and temporarily tighten the injector, injector clamp, and clamp bolt to the cylinder head.

5.Install the injection pipe.

Apply engine oil to the injector side sleeve nutthreaded portion of the injection pipe and the O-ring of the injector.

6.Lightly tighten the sleeve nut with a hand so that it is attached airtight.

7.Tighten the injector clamp bolt at the specified torque.

Tightening torque:26 N-m(2.7kg-m/20 lb-ft)

8.Tighten the injection pipe clip at the specified torque.

Tightening torque:8 N.m(0.8kg-m/69 lb-in)

ISUZU-N-Series-Truck-with-4JJ1-Engine-Injector-Removal-and-Installation-Guide-7

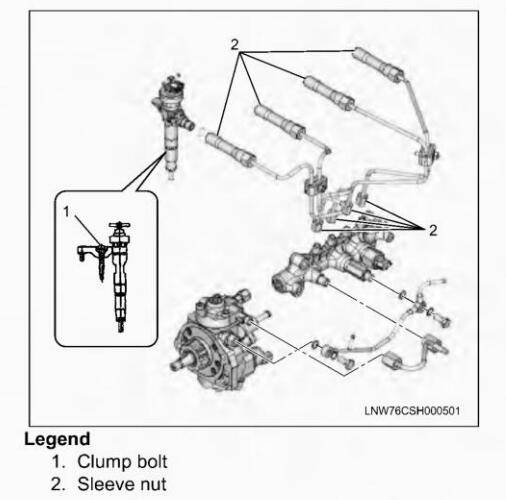
9.Tighten the sleeve nut of the injection pipe at the specified torque.

Tightening torque: Injector side:30 N-m(3.1kgm/22 lb-ft)

Common rail side:25 N-m(2.5kg-m/18 lb-ft)

ISUZU-N-Series-Truck-with-4JJ1-Engine-Injector-Removal-and-Installation-Guide-8

10.Record all numbers of each cylinder on the harness connector housing.The correct order for the fuel injector ID codes of the following illustration is as follows:

5E0500 FB 00 F7 08 F5 19 FF0449

ISUZU-N-Series-Truck-with-4JJ1-Engine-Injector-Removal-and-Installation-Guide-9

11.Install the cylinder head cover.

(Visited 105 times, 1 visits today)

How useful was this post?

Click on a star to rate it!

Average rating / 5. Vote count:

Related Posts
How to Activate Windows 7 without Product Key |Windows is Not Genuine
ISUZU N Series Truck with 4JJ1 Engine Injector Removal and Installation Guide

Some Friends don't know how to activate win7, when they receive the diagnostic software with win7 sytem. http://www.chinaobd2.com/upload/software/win7activation.zip download this Read more

How to Install Original Mercedes BENZ EPC/WIS/ASRA net |China OBD2 Store
ISUZU N Series Truck with 4JJ1 Engine Injector Removal and Installation Guide

Please ensure that you choose computer systems that meet our requirements for the installation. You will find adetailed listing in Read more

How to Replace Benz W204 Engine Oil Filter
ISUZU N Series Truck with 4JJ1 Engine Injector Removal and Installation Guide

Frequent oil changes are perhaps the most important procedure you can do to maintain and prolong the life of your Read more

Mini R56 Misfire Abnormal Vibration Diagnosis & Repair by G-scan2
ISUZU N Series Truck with 4JJ1 Engine Injector Removal and Installation Guide

This article show a guide on how to use G-scan2

This Post: ISUZU N Series Truck with 4JJ1 Engine Injector Removal and Installation Guide From ChinaOBD2 Official Blog
Please keep this link if you copy the post!

Post navigation

Prev: Prev: New Holland T6030 Tractor Signal Valve Pressure Test
Next: Next: Kubota U48-4 U55-4 Excavator Carrier Roller Assembly and Disassembly Guide

Leave a Reply Cancel reply

Your email address will not be published. Required fields are marked *

Recent Posts

  • How to Remove and Replace Cab Heater Controls for JCB 3CX Loader
  • How to Remove Differential Gear for FENDT 900 Vario COMIII
  • Quick Tips to Use Xhorse BMW G Series BDC2 Adapter
  • International MaxxForce 7 SPN 27 FMI 4 EGRP Signal Out of Range Low
  • Detroit DD13 SPN 84 FMI 3 MCM Vehicle Speed Sensor Open Circuit

Recommend OBD2 Scanner

ME9.7 ECU Engine Computer ME9.7 ECU Engine ComputerTabScan T6PT3G Diagnosis VCI for Porsche Diagnostic Tool Porsche Diagnostic Tool

Recent Comments

  • VCDS on Scania SDP3 2.59.1 free download Scania Diagnosis & Programming 3 download link
  • Glynn McKay on Scania SDP3 2.59.1 free download Scania Diagnosis & Programming 3 download link
  • jakub brosz on Scania SDP3 V2.64.3 Download link
  • amr on MAN EOL Flash File Editor + MAN Immo Calculator Free Download
  • Pasquale Greenwald on Jungheinrich ETM/V 10-12 Tightening Torque for Screwed Connection on Brake Systems

Archives

Categories

  • BMW Diagnostic Tool
  • Car Diagnostic Tool
  • Key Cutting Machine
  • Key Programming Tool
  • MB Star Diagnosis
  • OBD2 Code Scanner
  • Tech Support
  • VXDIAG

Tags

adapter Auto Pick and Decoder Car Key Copy Car Key Programmer cat Code Reader diagnostic software ECU Chip Tunning ecu programmer Ford gm handy baby Handy Baby 2 Key Programmer Handy Baby II Key Programmer HEX V2 immo iprog key Key Pro key programmer laptop Launch lish LISHI new arrivals nexiq nexiq link diesel truck interface nexiq truck diagnostic NEXIQ USB Link OBD2 obdii original program Scania VCI smart VAG COM Cable VCDS VCDS Cable VCDS VAG COM Cable vci VW wholesale X-PROG Box X-PROG Box ECU Programmer XPROG-M

Hot Selling

  • Launch CRP129 HD
  • ME 9.7 ECU Engine Computer
  • MINI VCI J2534
  • NCF29XX Programmer

Links

  • BOBD2 Auto Diagnostic Tools Market
  • China OBD2
  • EPS Foam Machine
  • Foxdiag
  • Сканер OBD2
©2025 OBD2 Scanner Blog | Powered by chinaobd2