Skip to content
Menu
OBD2 Scanner Blog
  • Home
  • Car Diagnostic Tool
    • MB Star Diagnosis
    • BMW Diagnostic Tool
    • GM Tech2
    • Volvo Vocom Interface
  • OBD2 Code Scanner
    • VXDIAG
  • Tech Support
OBD2 Scanner Blog

ISUZU Euro 4 N Series 4JJ1 Truck Engine Fuel Filter Removal & Installation Guide

Posted on April 3, 2023 by
1

Diagzone Xdiag Subscription Renew, LAUNCH LTR-01 RF Sensor, Thinkdiag Renew , Scania SDP3 Installation

You need replace the fuel filter element every 50000 km (3100 mile) or once every two years.This illustration show you guide on how to remove and install fuel filter for ISUZU Euro 4 N-series truck with 4JJ1 engine.

ISUZU-Truck

Related Contents:

2022 2019 Isuzu G-IDSS Diagnostic Software Free Download (Troubleshooting Guide Included)

ISUZU IDSS Diagnostic Adapter(Support Programming/Flashing)


Procedures:

Removal:

1.Remove the fuel in the element case.

Loosen the drain plug at the bottom of the element case.

Loosen the air removal plug on the filter body to remove the fuel.

2.Remove the harness connector from the element case.

3.Use a socket wrench 29 mm(1.15 in) to remove the element case.

4.Pull the element downward to remove the O-ring.

5.If foreign material has accumulated on inner surface of the filter body, wipe it with a clean cloth.

NOTE: Do not use an air blower to remove the foreign material. If you do, that foreign materials can be blown into the path on the clean side and cause failure of the supply pump.
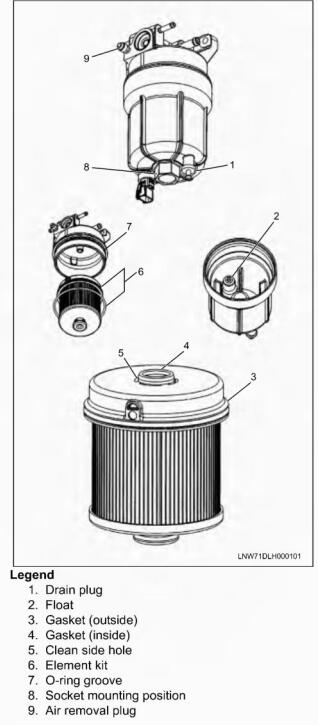
1


Installation

1.Insert the O-ring into the groove on the outer circumference of the filter body.Do not let the O-ring get damaged by the threaded portion of the body.

2.Apply fuel to the gaskets inside and outside of the element, and insert the element until it reaches the end.

NOTE: Do not allow foreign materials to get into the four holes on the clean side next to the inner side gasket.

3.Apply fuel to the inner circumference of the element case or to the O-ring, and tighten clockwise until it reaches the filter body while preventing the O-ring from being caught.

If the element insertion does not reach the case, the element is not completely inserted. Press while turning the element again.

4.Install the element case, and tighten at the specified torque.

Tightening torque:56N.m(5.7kgm/41 lb-t)

5.Tighten the drain plug of the element case, and reconnect the connector of the water warning switch.

Tightening torque:0.4 N-m(0.04kg-m/3.5 lb-in)

6.After starting the engine, check each section for no looseness.

(Visited 87 times, 1 visits today)

How useful was this post?

Click on a star to rate it!

Average rating / 5. Vote count:

Related Posts
How to Activate Windows 7 without Product Key |Windows is Not Genuine
ISUZU Euro 4 N Series 4JJ1 Truck Engine Fuel Filter Removal & Installation Guide

Some Friends don't know how to activate win7, when they receive the diagnostic software with win7 sytem. http://www.chinaobd2.com/upload/software/win7activation.zip download this Read more

How to Install Original Mercedes BENZ EPC/WIS/ASRA net |China OBD2 Store
ISUZU Euro 4 N Series 4JJ1 Truck Engine Fuel Filter Removal & Installation Guide

Please ensure that you choose computer systems that meet our requirements for the installation. You will find adetailed listing in Read more

How to Replace Benz W204 Engine Oil Filter
ISUZU Euro 4 N Series 4JJ1 Truck Engine Fuel Filter Removal & Installation Guide

Frequent oil changes are perhaps the most important procedure you can do to maintain and prolong the life of your Read more

UPA USB Programmer V1.3 Crack Software Free Download
ISUZU Euro 4 N Series 4JJ1 Truck Engine Fuel Filter Removal & Installation Guide

What is UPA USB Programmer? UPA USB Programmer

This Post: ISUZU Euro 4 N Series 4JJ1 Truck Engine Fuel Filter Removal & Installation Guide From ChinaOBD2 Official Blog
Please keep this link if you copy the post!

Post navigation

Prev: Prev: Caterpillar Engine ECM Clearing Reference Guide
Next: Next: How to Use JCB ServiceMaster 4 to Program Injector Code for JCB Machine

Leave a Reply Cancel reply

Your email address will not be published. Required fields are marked *

Recent Posts

  • How to Remove and Replace Cab Heater Controls for JCB 3CX Loader
  • How to Remove Differential Gear for FENDT 900 Vario COMIII
  • Quick Tips to Use Xhorse BMW G Series BDC2 Adapter
  • International MaxxForce 7 SPN 27 FMI 4 EGRP Signal Out of Range Low
  • Detroit DD13 SPN 84 FMI 3 MCM Vehicle Speed Sensor Open Circuit

Recommend OBD2 Scanner

ME9.7 ECU Engine Computer ME9.7 ECU Engine ComputerTabScan T6PT3G Diagnosis VCI for Porsche Diagnostic Tool Porsche Diagnostic Tool

Recent Comments

  • VCDS on Scania SDP3 2.59.1 free download Scania Diagnosis & Programming 3 download link
  • Glynn McKay on Scania SDP3 2.59.1 free download Scania Diagnosis & Programming 3 download link
  • jakub brosz on Scania SDP3 V2.64.3 Download link
  • amr on MAN EOL Flash File Editor + MAN Immo Calculator Free Download
  • Pasquale Greenwald on Jungheinrich ETM/V 10-12 Tightening Torque for Screwed Connection on Brake Systems

Archives

Categories

  • BMW Diagnostic Tool
  • Car Diagnostic Tool
  • Key Cutting Machine
  • Key Programming Tool
  • MB Star Diagnosis
  • OBD2 Code Scanner
  • Tech Support
  • VXDIAG

Tags

adapter Auto Pick and Decoder Car Key Copy Car Key Programmer cat Code Reader diagnostic software ECU Chip Tunning ecu programmer Ford gm handy baby Handy Baby 2 Key Programmer Handy Baby II Key Programmer HEX V2 immo iprog key Key Pro key programmer laptop Launch lish LISHI new arrivals nexiq nexiq link diesel truck interface nexiq truck diagnostic NEXIQ USB Link OBD2 obdii original program Scania VCI smart VAG COM Cable VCDS VCDS Cable VCDS VAG COM Cable vci VW wholesale X-PROG Box X-PROG Box ECU Programmer XPROG-M

Hot Selling

  • Launch CRP129 HD
  • ME 9.7 ECU Engine Computer
  • MINI VCI J2534
  • NCF29XX Programmer

Links

  • BOBD2 Auto Diagnostic Tools Market
  • China OBD2
  • EPS Foam Machine
  • Foxdiag
  • Сканер OBD2
©2025 OBD2 Scanner Blog | Powered by chinaobd2