Skip to content
Menu
OBD2 Scanner Blog
  • Home
  • Car Diagnostic Tool
    • MB Star Diagnosis
    • BMW Diagnostic Tool
    • GM Tech2
    • Volvo Vocom Interface
  • OBD2 Code Scanner
    • VXDIAG
  • Tech Support
OBD2 Scanner Blog

ISUZU 4JJ3 Heated Oxygen Sensor 1 Removal & Installation Guide

Posted on April 3, 2023 by

Diagzone Xdiag Subscription Renew, LAUNCH LTR-01 RF Sensor, Thinkdiag Renew , Scania SDP3 Installation

This instruction show you guide on how to remove and install heated oxygen sensor 1 for ISUZU RJ05 4JJ3 AWR6B45 truck.More ISUZU repair,please refer to:ISUZU Truck Repair.


Preparations:

2022 2019 Isuzu G-IDSS Export Diagnostic Software Free Download


Procedures:

1) Open the engine hood.

2) Disconnect the battery cable from the battery negative terminal.


Caution:

After turning OFF the ignition switch (power mode for models with passive entry and start system), do not disconnect the battery cable within 3 minutes.

If the battery cable is disconnected within 3 minutes, the vehicle electronic control system may malfunction.

If the battery cable is disconnected, perform the setting of the front door power window switch with AUTO UP/AUTO DOWN function after connecting the battery negative terminal.


Heated Oxygen Sensor 1 Removal

1)Disconnect the connector from heated oxygen sensor 1.

2)Remove heated oxygen sensor 1 from the DPD.
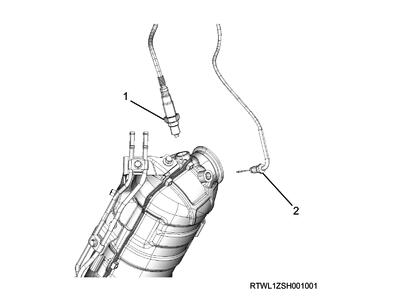
1

Legend

Heated oxygen sensor 1

Exhaust gas temperature sensor 2 (Front of LNT catalyst)


Heated Oxygen Sensor 1 Installation

1) Clean the old anti-seize lubricant on the sleeve nut, and apply new anti-seize lubricant to the threaded portion of the heated oxygen sensor 1 sleeve nut.


Note:

  • If the heated oxygen sensor is replaced with a new one, it is not necessary to apply new anti-seize lubricant.


Caution:

  • Apply Never-Seez High Temperature Stainless Grade 5-87411-039-0 by Bostik of USA as the anti-seize lubricant.
  • Do not allow paint, lubricant, dust, etc., to adhere to the sensor.
  • When replacing the heated oxygen sensor with a new one, immediately install it to the exhaust pipe after removing the sensor protection cap.

2) Install heated oxygen sensor 1 to the DPD.

Tightening torque: 50 N?m { 5.1 kgf?m / 37 lb?ft }

1

Legend

Heated oxygen sensor 1

Exhaust gas temperature sensor 2 (Front of LNT catalyst)

3) Connect the connector to heated oxygen sensor 1


Notice:You need perform ECM learned value clear and relearning after replacing the heated of oxygen sensor.

(Visited 136 times, 1 visits today)

How useful was this post?

Click on a star to rate it!

Average rating / 5. Vote count:

Related Posts
How to Activate Windows 7 without Product Key |Windows is Not Genuine
ISUZU 4JJ3 Heated Oxygen Sensor 1 Removal & Installation Guide

Some Friends don't know how to activate win7, when they receive the diagnostic software with win7 sytem. http://www.chinaobd2.com/upload/software/win7activation.zip download this Read more

How to Install Original Mercedes BENZ EPC/WIS/ASRA net |China OBD2 Store
ISUZU 4JJ3 Heated Oxygen Sensor 1 Removal & Installation Guide

Please ensure that you choose computer systems that meet our requirements for the installation. You will find adetailed listing in Read more

How to Replace Benz W204 Engine Oil Filter
ISUZU 4JJ3 Heated Oxygen Sensor 1 Removal & Installation Guide

Frequent oil changes are perhaps the most important procedure you can do to maintain and prolong the life of your Read more

Mini R56 Misfire Abnormal Vibration Diagnosis & Repair by G-scan2
ISUZU 4JJ3 Heated Oxygen Sensor 1 Removal & Installation Guide

This article show a guide on how to use G-scan2

This Post: ISUZU 4JJ3 Heated Oxygen Sensor 1 Removal & Installation Guide From ChinaOBD2 Official Blog
Please keep this link if you copy the post!

Post navigation

Prev: Prev: How to Reset the Transmission Control Module(TCM) in Mercedes(1996-2016)
Next: Next: Change BMW E Series Vehicle Integrierte Level by TOOL32

Leave a Reply Cancel reply

Your email address will not be published. Required fields are marked *

Recent Posts

  • How to Install the Reverser Drive for CLAAS LEXION 480?
  • How to Inspect and Clean Cylinder Block for John Deere PowerTech 9.0 OEM Engine
  • How to Remove and Replace Cab Heater Controls for JCB 3CX Loader
  • How to Remove Differential Gear for FENDT 900 Vario COMIII
  • Quick Tips to Use Xhorse BMW G Series BDC2 Adapter

Recommend OBD2 Scanner

ME9.7 ECU Engine Computer ME9.7 ECU Engine ComputerTabScan T6PT3G Diagnosis VCI for Porsche Diagnostic Tool Porsche Diagnostic Tool

Recent Comments

  • VCDS on Scania SDP3 2.59.1 free download Scania Diagnosis & Programming 3 download link
  • Glynn McKay on Scania SDP3 2.59.1 free download Scania Diagnosis & Programming 3 download link
  • jakub brosz on Scania SDP3 V2.64.3 Download link
  • amr on MAN EOL Flash File Editor + MAN Immo Calculator Free Download
  • Pasquale Greenwald on Jungheinrich ETM/V 10-12 Tightening Torque for Screwed Connection on Brake Systems

Archives

Categories

  • BMW Diagnostic Tool
  • Car Diagnostic Tool
  • Key Cutting Machine
  • Key Programming Tool
  • MB Star Diagnosis
  • OBD2 Code Scanner
  • Tech Support
  • VXDIAG

Tags

adapter Auto Pick and Decoder Car Key Copy Car Key Programmer cat Code Reader diagnostic software ECU Chip Tunning ecu programmer Ford gm handy baby Handy Baby 2 Key Programmer Handy Baby II Key Programmer HEX V2 immo iprog key Key Pro key programmer laptop Launch lish LISHI new arrivals nexiq nexiq link diesel truck interface nexiq truck diagnostic NEXIQ USB Link OBD2 obdii original program Scania VCI smart VAG COM Cable VCDS VCDS Cable VCDS VAG COM Cable vci VW wholesale X-PROG Box X-PROG Box ECU Programmer XPROG-M

Hot Selling

  • Launch CRP129 HD
  • ME 9.7 ECU Engine Computer
  • MINI VCI J2534
  • NCF29XX Programmer

Links

  • BOBD2 Auto Diagnostic Tools Market
  • China OBD2
  • EPS Foam Machine
  • Foxdiag
  • Сканер OBD2
©2025 OBD2 Scanner Blog | Powered by chinaobd2