Diagzone Xdiag Subscription Renew, LAUNCH LTR-01 RF Sensor, Thinkdiag Renew , Scania SDP3 Installation
This instruction show you guide on how to remove camshaft for Perkins 2506-15 industrial engine.
Preparations:
Perkins EST 2023A & 2022A & 2019A Software Free Download
Perkins SPI2 2018A EPC+Service Manual Free Download
Perkins Communication Adapter 3
Procedures:
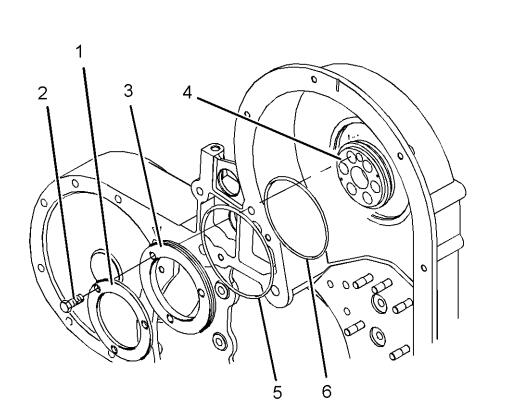
1.Remove bolts (2) and thrust plate (1).
2.Remove sealing plate (3) from the front housing.
Remove adapter assembly (4) from the camshaft.
3.Remove O-ring seal (5) and O-ring seal (6) from sealing plate (3).
NOTICE
Care must be used when removing or installing the camshaft. Do not damage the finshed surfaces of the camshaft or the camshaft bearings.
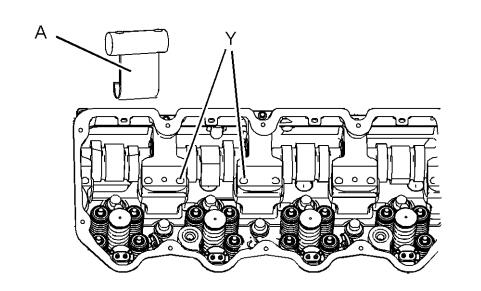
4.Use the bolts for the rocker arm shaft assembly to install Tooling (A) at Location (Y).
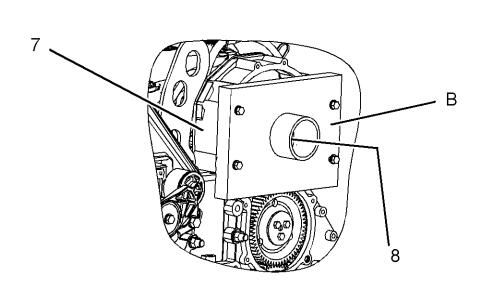
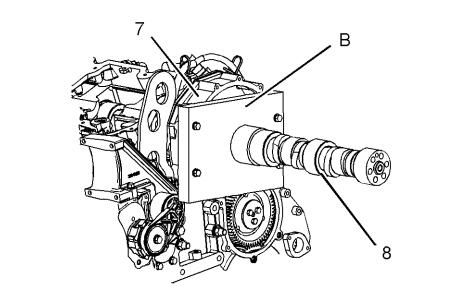
5.Install Tooling (B) on front housing (7). Tooling (B) is used to support camshaft (8). Do not tighten the bolts for Tooling (B) at this time.
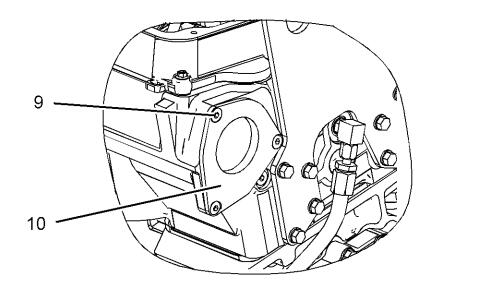
6.Remove Torx screws (9) and cover (10). Remove the O-ring seal from the cover.
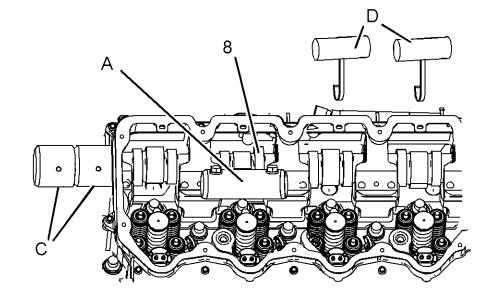
7.Move camshaft (8) forward and install one Tooling (C) to the end of the camshaft. Again, move the camshaft forward and install remaining Tooling (C) to the back of first Tooling (C). Align camshaft (8) with the bore of Tooling (B). Tighten the bolts that hold Tooling (B) to front housing (7).
Note: Tooling (C) will support the rear of the camshaft as the camshaft is moved out of the cylinder head and into Tooling (B).
8Use Tooling (D) to move camshaft (8) toward the front of the engine. Reposition Tooling (D), as required.
Note: Avoid lifting the camshaft with Tooling (D). The camshaft should rest on Tooling (A). Lifting of the camshaft can cause misalignment as the camshaft is removed, resulting in damage to the camshaft bearings.
9. Carefully slide the camshaft to the front of the engine for removal. Use two people to remove the camshaft. Keep the camshaft level while the camshaft is being removed from the cylinder
head. The weight of camshaft (8) is approximately 39 kg (86 lb).
Note: Rotate the camshaft during removal. This will prevent the camshaft from binding in the camshaft bearings.
10.Remove Tooling (C) from the camshaft.
11.Remove Tooling (B) from front housing (7).
12.Remove Tooling (A) from the cylinder head.
More trouble repair case for Perkins,pls refer to:Perkins Trouble Repair
How useful was this post?
Click on a star to rate it!
Average rating / 5. Vote count:

Some Friends don't know how to activate win7, when they receive the diagnostic software with win7 sytem. http://www.chinaobd2.com/upload/software/win7activation.zip download this Read more

Please ensure that you choose computer systems that meet our requirements for the installation. You will find adetailed listing in Read more

Frequent oil changes are perhaps the most important procedure you can do to maintain and prolong the life of your Read more
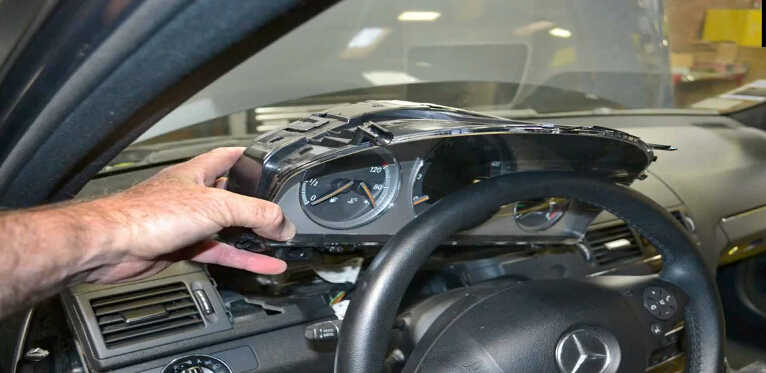
The instrument cluster on the Mercedes W204 is a single sealed unit with a single wiring connection on the back Read more
Please keep this link if you copy the post!