Skip to content
Menu
OBD2 Scanner Blog
  • Home
  • Car Diagnostic Tool
    • MB Star Diagnosis
    • BMW Diagnostic Tool
    • GM Tech2
    • Volvo Vocom Interface
  • OBD2 Code Scanner
    • VXDIAG
  • Tech Support
OBD2 Scanner Blog

How to Remove and Install Engine Oil Cooler for Perkins 400A/400D Engine

Posted on January 13, 2025 by
How to Remove and Install Engine Oil Cooler for Perkins 400A400D Engine (2)

Diagzone Xdiag Subscription Renew, LAUNCH LTR-01 RF Sensor, Thinkdiag Renew , Scania SDP3 Installation

This instruction show you guide on how to remove and install engine oil cooler for Perkins 400A and 400D engine.

Preparations:

Perkins EST 2024A & 2023A & 2019A Software Free Download

Perkins SPI2 2018A EPC+Service Manual Free Download

Perkins Communication Adapter 3

Removal Procedure

1 Drain the coolant from the cooling system into a suitable container. Refer to Operation and
Maintenance Manual, “Cooling System Coolant -Drain” for the correct procedure.
2 Drain the engine lubricating oil into a suitable container. Refer to Operation and Maintenance
Manual, “Engine Oil and Filter – Change” for the correct procedure.

How to Remove and Install Engine Oil Cooler for Perkins 400A400D Engine (1)

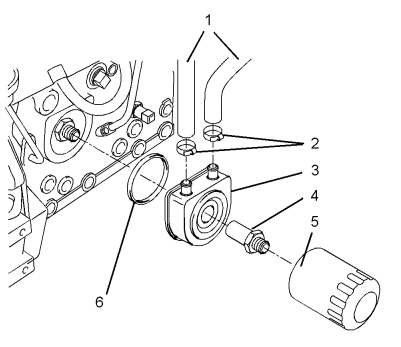
3 Use Tooling (A) to remove oil filter element (5).
4 Loosen hose clamps (2) and disconnect hoses (1).
Note the positions of the coolant inlet and the coolant outlet for installation.
5 Remove adapter (4) and remove oil cooler (3) from the cylinder block.

Note: Make a temporary mark in order to show the orientation of the oil cooler for installation.
6 Remove O-ring seal (6) from oil cooler (3).

Installation Procedure

1 Ensure that the oil cooler is clean and free from damage. Clean the mating surfaces of the cylinder block.

How to Remove and Install Engine Oil Cooler for Perkins 400A400D Engine (2)

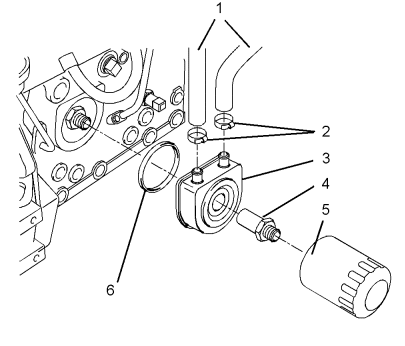
2 Install a new O-ring seal (6) to oil cooler (3).
Position oil cooler (3) on the cylinder block and install adapter (4). Tighten adapter (4) to a torque of 34 N·m (25 lb ft).
Note: Ensure that the oil cooler is correctly oriented.
3 Connect hoses (1) to the coolant inlet and the coolant outlet on oil cooler (3). Tighten hose clamps (2).
4 Install a new oil filter element (5).
5 Fill the cooling system to the correct level. Refer to
Operation and Maintenance Manual, “Cooling System Coolant – Fill” for the correct procedure.

6 Fill the engine oil pan to the correct level. Refer to Operation and Maintenance Manual, “Engine Oil Filter – Change” for the correct procedure.

More trouble repair case for Perkins,pls refer to:Perkins Trouble Repair

How useful was this post?

Click on a star to rate it!

Average rating / 5. Vote count:

Related Posts
Original Handy Baby 2 II Key Programmer Hand-held Car Key Copy Key Programmer for 4D/46/48 Chips
How to Remove and Install Engine Oil Cooler for Perkins 400A/400D Engine

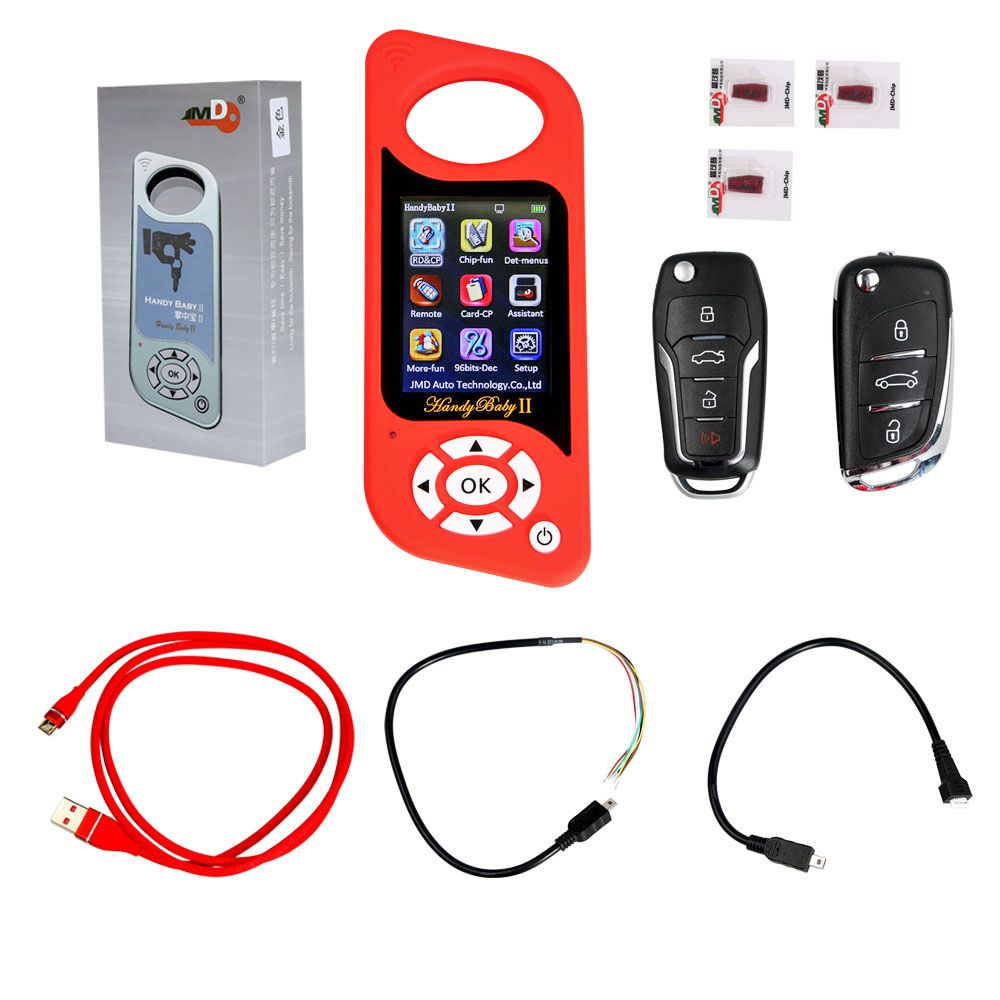
Handy Baby 2 II Key Programmer Hand-held Car Key Copy Key Programmer for 4D/46/48 ChipsNote: Language: English, SpanishThis Device can't work together Read more

Renault CAN Clip V175 and Consult 3 III For Nissan Professional Diagnostic Tool 2 in 1

Renault CAN Clip V175 and Consult 3 III For Nissan Professional Diagnostic Tool 2 in 1 Descriptions of Consult 3 Read more

Super VAG K+CAN V4.6 With Multi Language

Super VAG K+CAN V4.6 Top 3 Reasons To Get Super VAG: Software Version: V4.6Supported Languages: English/ Spanish/ Italian/ Portuguese/ GreekUDS Protocol Read more

CHIP PROGRAMMER SOCKET SSOP34

CHIP PROGRAMMER SOCKET SSOP34 This is the SSOP34 socket adapter for chip programmer. Package including: 1pc x CHIP PROGRAMMER SOCKET Read more

This Post: How to Remove and Install Engine Oil Cooler for Perkins 400A/400D Engine From ChinaOBD2 Official Blog
Please keep this link if you copy the post!

Tags: adapter cat

Post navigation

Prev: Prev: CG100X V1.7.0.0 Update and Download
Next: Next: Launch X431 ECU Programmer Erase Benz 4th Generation 7-Speed TCU via Boot

Leave a Reply Cancel reply

Your email address will not be published. Required fields are marked *

Recent Posts

  • How to Remove and Replace Cab Heater Controls for JCB 3CX Loader
  • How to Remove Differential Gear for FENDT 900 Vario COMIII
  • Quick Tips to Use Xhorse BMW G Series BDC2 Adapter
  • International MaxxForce 7 SPN 27 FMI 4 EGRP Signal Out of Range Low
  • Detroit DD13 SPN 84 FMI 3 MCM Vehicle Speed Sensor Open Circuit

Recommend OBD2 Scanner

ME9.7 ECU Engine Computer ME9.7 ECU Engine ComputerTabScan T6PT3G Diagnosis VCI for Porsche Diagnostic Tool Porsche Diagnostic Tool

Recent Comments

  • VCDS on Scania SDP3 2.59.1 free download Scania Diagnosis & Programming 3 download link
  • Glynn McKay on Scania SDP3 2.59.1 free download Scania Diagnosis & Programming 3 download link
  • jakub brosz on Scania SDP3 V2.64.3 Download link
  • amr on MAN EOL Flash File Editor + MAN Immo Calculator Free Download
  • Pasquale Greenwald on Jungheinrich ETM/V 10-12 Tightening Torque for Screwed Connection on Brake Systems

Archives

Categories

  • BMW Diagnostic Tool
  • Car Diagnostic Tool
  • Key Cutting Machine
  • Key Programming Tool
  • MB Star Diagnosis
  • OBD2 Code Scanner
  • Tech Support
  • VXDIAG

Tags

adapter Auto Pick and Decoder Car Key Copy Car Key Programmer cat Code Reader diagnostic software ECU Chip Tunning ecu programmer Ford gm handy baby Handy Baby 2 Key Programmer Handy Baby II Key Programmer HEX V2 immo iprog key Key Pro key programmer laptop Launch lish LISHI new arrivals nexiq nexiq link diesel truck interface nexiq truck diagnostic NEXIQ USB Link OBD2 obdii original program Scania VCI smart VAG COM Cable VCDS VCDS Cable VCDS VAG COM Cable vci VW wholesale X-PROG Box X-PROG Box ECU Programmer XPROG-M

Hot Selling

  • Launch CRP129 HD
  • ME 9.7 ECU Engine Computer
  • MINI VCI J2534
  • NCF29XX Programmer

Links

  • BOBD2 Auto Diagnostic Tools Market
  • China OBD2
  • EPS Foam Machine
  • Foxdiag
  • Сканер OBD2
©2025 OBD2 Scanner Blog | Powered by chinaobd2