Diagzone Xdiag Subscription Renew, LAUNCH LTR-01 RF Sensor, Thinkdiag Renew , Scania SDP3 Installation
This instruction show you guide on how to remove and install ECU/Valve assemble for Wabco Easy-Stop trailer ABS.
Preparations:
Meritor Wabco Toolbox 13+ECAS CAN2 V3.00 Download & Installation
Meritor Wabco Toolbox Diagnostic Software Download
How to Remove the ECU/Valve Assembly
1.Release all pressure from the air system.
2.Attach labels to identify all air lines.
3.Disconnect the air lines from the ECU/Valve Assembly.
4.Disconnect the power (or power/diagnostic) cable, additional relay valve cable (if used),and all sensor cables from the ECU/Valve Assembly.
5.Remove the ECU/Valve Assembly from its mounting location:
Bracket-mounted: Loosen and remove thetwo mounting bolts and lock nuts that holdthe assembly to the cross member. Remove the assembly.
Nipple-mounted to Air Tank: Unscrew theassembly from the air tank.
If the assembly being replaced is underwarranty, please return it to the trailer OEM for
How to Install the ECU/Valve Assembly
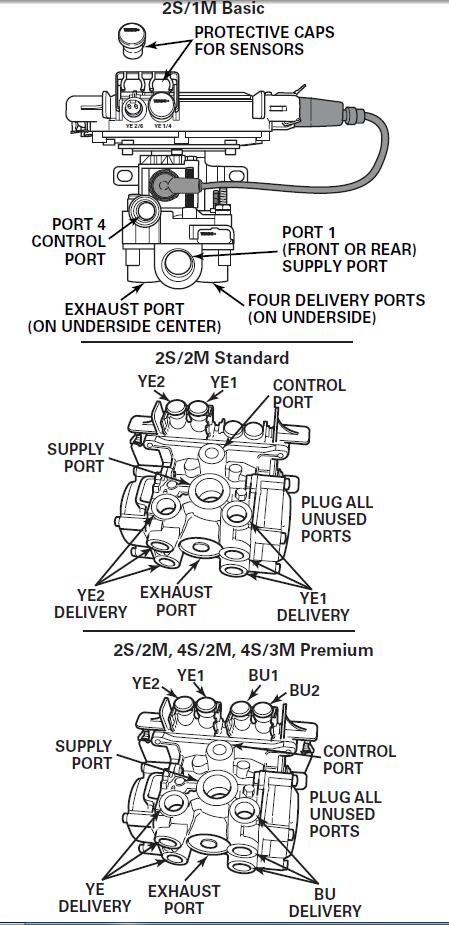
NOTE: The ECU/Valve Assembly is supplied with black protective caps on each sensor connector.
NOTE: When a sensor cable is not plugged into a sensor connector, the black cap must remain on the connector to protect it from dirt and contamination.
CAUTION
You must use a Schedule 80 pipe nipple (3/4-inch NPTF) to nipple mount the ECU/Valve Assembly securely to the air tank to avoid possible serious personal injury and damage to components.
WARNING
You must use a Schedule 80 hex nipple (3/4-inch NPTF) to mount the ECU/single modulator valve assembly securely to the air tank to avoid possible serious personal injury and damage to the component.
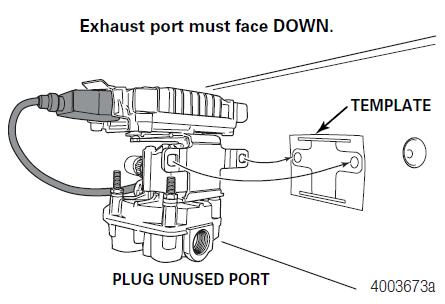
1.Use a 3/4-inch Schedule 80 hex nipple to attach ECU/single modulator valve assembly to a reinforced air tank. Do not overtighten.
NOTE: Meritor WABCO does not recommend use of a vise when installing the hex nipple. Use of a vise may cause overclamping. Overclamping may damage the internal components of the ECU/single modulator valve assembly.
2.Use a 3/4-inch pipe plug to plug unused supply port (Port 1). Apply SAE-standard,DOT-approved Teflon tape or paste-type thread sealant to all pipe threads beyond the first two threads. Pipes with pre-applied thread sealant may also be used.
3.Rotate and tighten the ECU/single modulator valve assembly until the exhaust port faces down and the connection is secure. Use a torque wrench or ratchet with extension at the 3/4-inch pipe plug installed on the front supply port (Port 1).
More repair case for Wabco machine,please refer to:WABCO Trouble Repair
How useful was this post?
Click on a star to rate it!
Average rating / 5. Vote count:

Some Friends don't know how to activate win7, when they receive the diagnostic software with win7 sytem. http://www.chinaobd2.com/upload/software/win7activation.zip download this Read more

Please ensure that you choose computer systems that meet our requirements for the installation. You will find adetailed listing in Read more

Frequent oil changes are perhaps the most important procedure you can do to maintain and prolong the life of your Read more

This article show a guide on how to use G-scan2
Please keep this link if you copy the post!