Diagzone Xdiag Subscription Renew, LAUNCH LTR-01 RF Sensor, Thinkdiag Renew , Scania SDP3 Installation
This instruction show you guide on how to setup diagnostic adapter in Volvo TechTool diagnostic software.
Related Conetents:
2024 Volvo PTT Premium Tech Tool PTT 2.8.231/2.8.150/2.7.116 Free Download
Volvo PROSIS 2023 2019 2018 Parts Catalog & Repair Manuals Free Download
Volvo Diagnostic Kit (88890300)
Volvo VOCOM 88890300 Diagnostic Kit
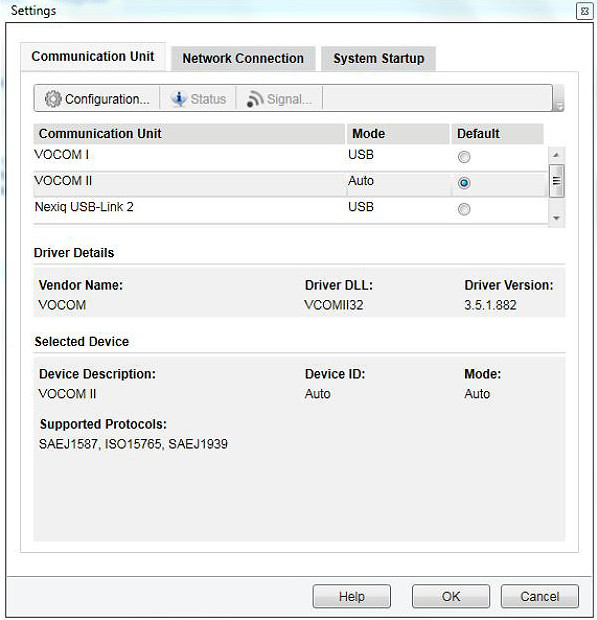
In Settings you are able to configure the following in Tech Tool:
Communication unit
Network connection
System Startup
You can access Settings in the Tech Tool menu or through the shortcut in the tool bar in the Product tab
Communication unit settings
In this tab you can see the installed communication unit drivers and select which one Tech Tool should use as default. It is possible to have several communication units configured on the same computer.
By default VOCOM I and VOCOM II are always installed and ready to be used in USB mode.
Tech Tool will automatically detect if you are using VOCOM I or VOCOM II.
If you want to use an RP1210 adapter, after installing the driver you need to select it as Default in the Communication Unit list.
RP1210 Adapters Support
In the list you will also see any RP1210 A/B/C compliant driver that you have installed on your machine.
Note: Although Tech Tool will list any RP1210 compliant driver, only the following communication units are officially supported by Tech Tool:
Nexiq USB Link (USB and Bluetooth)
Nexiq USB Link 2
Noregon JPRO DLA+
Noregon JPRO DLA+PLC
Noregon JPRO DLA+Wireless (USB and WLAN)
Dearborn DPA 5 (only USB, Dual or Quad device)
Dearborn DPA 4 Plus
Note: This unit does not support newer vehicles (OBD2013 and OBD2014).
XscapeEz EZ Tap
Note: This unit does not support newer vehicles (OBD2013 and OBD2014).
Configuration
This option will bring you the possible configurations for the selected communication unit.
Choose the communication unit you want to configure by selecting it in the Default column.
When a VOCOM II unit is selected in the Default column, clicking the Configuration button will take you directly to the VOCOM II Configuration Application. See section VOCOM II Config Application for information on how to configure VOCOM II.
There is a huge difference between the configurations for VOCOM I and RP1210 compliant communication units. This is because the configurations for Bluetooth and wireless connectivity for RP1210 units are handled outside Tech Tool, by each vendor specific application, while VOCOM I wireless configuration is handled inside Tech Tool Settings.
Note: For RP1210 communication units used in USB mode, no external configuration is needed and Tech Tool will have the correct USB setting configured by default. This means that no configuration is needed in Tech Tool to use any unit in USB mode, other than just activating the correct unit that you want to use.
Configure a VOCOM I unit
There are two connection modes available for VOCOM I:
USB
WLAN (wireless network)
USB Mode
In this mode, no configuration is needed. All you have to do is to plug in your device to any USB port on your computer and Tech Tool will automatically detect it.
If the device is connected to a product, Tech Tool will automatically start to read product data and request to start a work order.
Note: If your device is not being identified by Tech Tool, unplug the device from the USB port and plug in again, or try to plug in to another USB port.
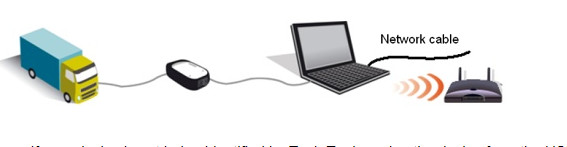
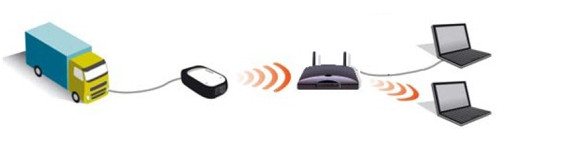
WLAN Mode
With WLAN mode, you always need to configure the device using the USB connection first. After the device is configured through USB, you will be able to configure the wireless mode.
There are two possible configurations for WLAN mode:
Direct
Access point
Note: When a USB connection is detected, Tech Tool will ignore the configured WLAN mode. This means that even when Tech Tool is configured to use VOCOM I in WLAN mode (Direct or Access Point) the detected USB connection will be the used connection and Tech Tool will not search for the configured device on the network.
WLAN Direct Mode
In this mode Tech Tool will connect directly to the communication unit, the device will host a wireless network and Tech Tool will connect to it.
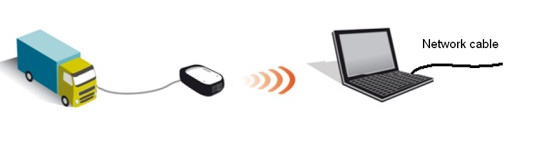
Note: Since the computer needs to connect directly to the wireless network hosted by the device, the wireless adapter in the computer cannot be used to access the internet. This means that you will need a cable connection or another wireless adapter to have internet access.
How to configure the device:
Connect a VOCOM I device to the computer using a USB cable (do not connect to the product yet).
Go to Settings.
Select VOCOM I in the list
Click Configuration.
Select WLAN as connection mode.
A configuration window will automatically pop-up informing that the device is not yet configured. If the connected device was already configured, a confirmation message will pop-up asking if you want to load the configuration or set up a new configuration, choose to set up a new configuration.
Select Direct as the connection type.
The configuration is automatically generated by the system.
Click OK to close the Vocom Configuration window.
The configuration will be saved on both the computer and the device.
VOCOM I is now configured as WLAN Direct.
Click OK to close Settings.
You can now unplug the device from the USB port and connect to a product. Product identification should start automatically.
Note: While in WLAN Direct mode the automatic identification start-up will take longer than in USB mode. Please make sure that product ignition key is ON, otherwise the device is not powered and will not host the wireless network. If the automatic identification does not start within one minute, click Connect to force Tech Tool to look for the configured device.
WLAN Access Point Mode
In this mode the communication unit will connect to an existing wireless network, making the device a network asset that can be accessed by any Tech Tool computer that is connected (wireless or cable) to the same network.
Note: Since the communication unit needs to connect to an existing network, the local IT support or network administrator is needed to provide correct network information to configure the device.
These are the network information needed to set up a device as access point mode:
IP Number
How useful was this post?
Click on a star to rate it!
Average rating / 5. Vote count:

Some Friends don't know how to activate win7, when they receive the diagnostic software with win7 sytem. http://www.chinaobd2.com/upload/software/win7activation.zip download this Read more

Please ensure that you choose computer systems that meet our requirements for the installation. You will find adetailed listing in Read more

Frequent oil changes are perhaps the most important procedure you can do to maintain and prolong the life of your Read more

This article show a guide on how to use G-scan2
Please keep this link if you copy the post!