Diagzone Xdiag Subscription Renew, LAUNCH LTR-01 RF Sensor, Thinkdiag Renew , Scania SDP3 Installation
This post show the guide on how to remove and install air conditioner compressors for HITACHI EX5600 excavator.
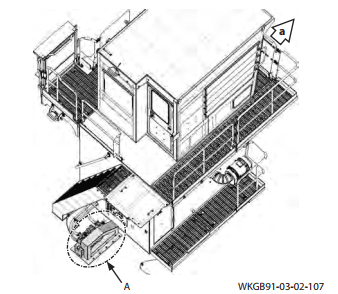
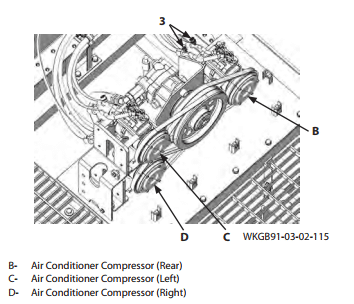
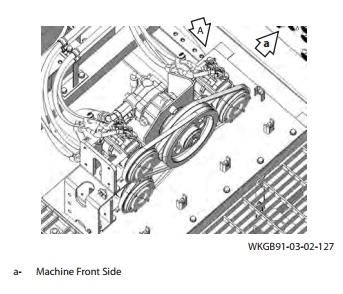
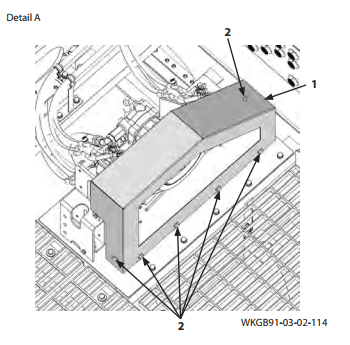
The air conditioner compressor is located in the rear of the cab bed. There are 3 air conditioner
compressors. The procedures for removal and installation are nearly identical. The explanation here is for air conditioner compressor (rear) (B).
CAUTION: The refrigerant is harmful to the environment. Be sure to recover all of the refrigerant. Servicing, recharging (charging),recovery, and other work must be performed only by a trained and qualified technician.
IMPORTANT: Cap the open ends in case the hoses and pipes have been disconnected. In addition, attach an identification tag onto the connectors, hoses, and pipes for assembly. If the clips which
secure the hoses have been removed, install the clips after connecting the hoses.
Related Contents:
Hitachi Dr.ZX diagnostic Tool
Hitachi AllinOne MPDr v3.32 v2.25 2021 Diagnostic Software Free Download
Hitachi Excavator ZX-5A ZX-5B ZX-5G Workshop Service Manuals PDF
Removal
1 Set the machine position for inspection and maintenance. Stop the engine. Turn OFF the isolation switch. (Refer to W1-6-1.)
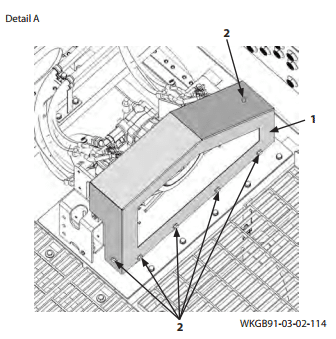
2 Remove bolts and washers (2) (6 used). Remove cover (1).
j : 17 mm
3 Connect the refrigerant recovery equipment to ports (3) (2 places) on air conditioner compressor
(rear) (B).
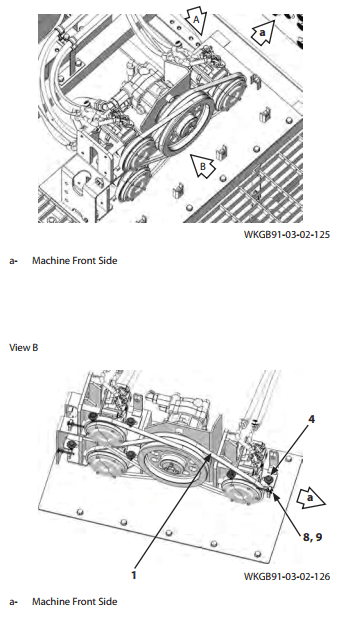
4 Loosen bolts and washers (4) (2 used). Loosen lock nut (9). Release tension of belt (1) by turning
adjusting bolt (8). Remove belt (1).
Bolt, Washer (4)
j : 17 mm
Adjusting Bolt (8), Lock Nut (9)
j : 13 mm
5 Remove bolts (10) (2 used). Disconnect hoses (5) (2 used). Remove O-rings (6) (2 used).
j : 10 mm
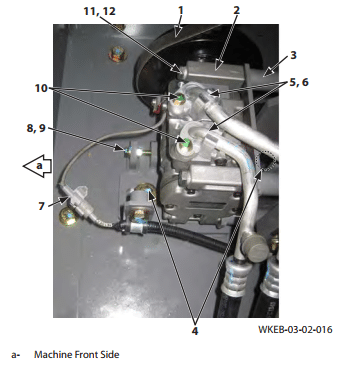
6 Disconnect connector (7).
7 Remove bolts (11) (4 used) and washers (12) (4 used). Remove air conditioner compressor (2) from bracket (3).
j : 13 mm
Installation
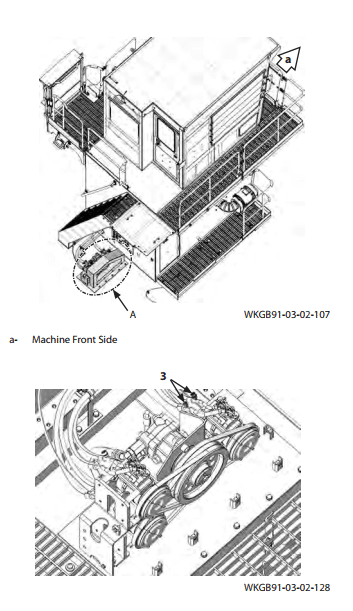
1 Install air conditioner compressor (2) onto bracket (3) with washers (12) (4 used) and bolts (11) (4 used).
j : 13 mm
m : 27 N·m (20.0 lbf·ft)
2 Apply compressor oil to O-rings (6) (2 used). Install O-rings (6) (2 used) onto hoses (5) (2 used). Connect hoses (5) (2 used) with bolts (10) (2 used).
j : 10 mm
m : 10 N·m (7.5 lbf·ft)
3 Install belt (1). Correctly adjust tension of belt (1) by turning adjusting bolt (8). Secure lock nut (9).
j : 13 mm
IMPORTANT: The belt does not fit when replacing with a new one. Therefore, adjust the belt tension again after running the engine at slow idle for 3 to 5 minutes.
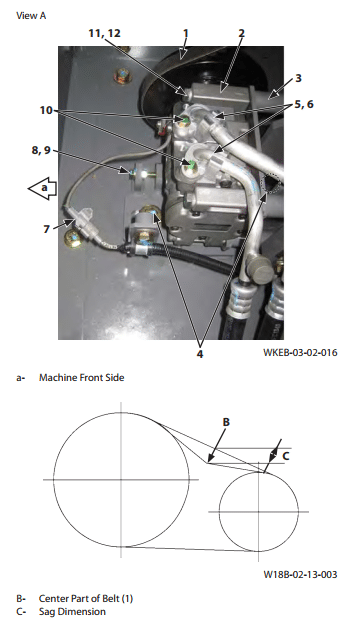
NOTE: Push belt (1) at center part (B) by fingers strongly with 98 N (72 lbf) and adjust dimension C to 11 to 12 mm (0.433 to 0.472 in).
4 Connect connector (7).
5 Secure bracket (3) with bolts and washers (4) (2 used).
j : 17 mm
m : 50 N·m (37 lbf·ft)
CAUTION: The refrigerant is harmful to the environment. Servicing, recharging (charging), recovery, and other work must be performed only by a trained and qualified technician.
6 Connect refrigerant charging equipment to ports (3) (2 places). Perform refrigerant charging.
7 Install cover (1) with bolts and washers (2) (6 used).
j : 17 mm
m : 50 N·m (37 lbf ft)
More repair case for Hitachi,please refer to Hitachi excavator trouble repair
How useful was this post?
Click on a star to rate it!
Average rating / 5. Vote count:

Some Friends don't know how to activate win7, when they receive the diagnostic software with win7 sytem. http://www.chinaobd2.com/upload/software/win7activation.zip download this Read more

Please ensure that you choose computer systems that meet our requirements for the installation. You will find adetailed listing in Read more

Frequent oil changes are perhaps the most important procedure you can do to maintain and prolong the life of your Read more
The instrument cluster on the Mercedes W204 is a single sealed unit with a single wiring connection on the back Read more
Please keep this link if you copy the post!