Diagzone Xdiag Subscription Renew, LAUNCH LTR-01 RF Sensor, Thinkdiag Renew , Scania SDP3 Installation

This guide provides step-by-step instructions for replacing the drive belt on Cummins engines DD13, DD15, and DD16.
Related Product
Cummins INLINE 7 Data Link Adapter Cummins Truck Diagnostic Tool with Cummins Insite 8.5/8.7/9.0 Software
CUMMINS INSITE V8.9.2.79 PRO 2024 Diagnosis Software
Important Notes:
Do Not Turn the Tensioner Clockwise: Turning the automatic belt tensioner clockwise can cause damage, necessitating the replacement of the entire assembly. Always turn the tensioner counterclockwise, and do not apply more than 90-100 N (66-73 lbf) of force to avoid damaging the tensioner.
Tensioner Sequence: When loosening the automatic tensioners and removing the drive belts, start with the front tensioners and belts (fan drive), then proceed to the rear tensioners and belts (alternator, air conditioning compressor, water pump). To unlock the belt tensioners, reverse this order: unlock the rear tensioner first, then the front tensioner.
Drive Belt Replacement Steps:
Prepare the Tensioner:
Insert a 1/2 inch breaker bar or 1/2 inch ratchet into the square hole in the front belt tensioner arm (pulley).
Slowly rotate the tensioner arm downward (counterclockwise) until you feel resistance.
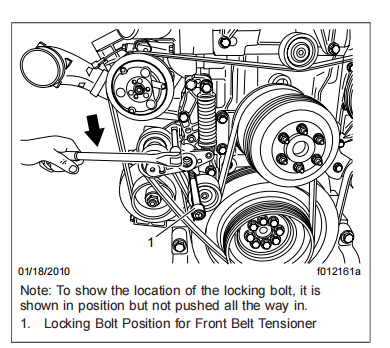
Lock the Front Tensioner:
Insert an 80 mm long, 10 mm diameter screw into the round hole in the tensioner tension arm, as shown in the illustration.
Push the screw all the way in to lock the tensioner in the released position.
Remove the socket wrench from the square hole.
Prepare the Rear Tensioner:
Insert a 1/2 inch breaker bar or 1/2 inch ratchet into the square hole of the rear belt tensioner arm (smooth pulley).
Slowly rotate the tensioner arm downward (counterclockwise) until you feel resistance.
Lock the Rear Tensioner:
Insert a second screw, 10 mm in diameter and 80 mm long, into the round hole in the rear tensioner arm and push it all the way in as shown in the figure.
The tensioner will be locked in the released position. Remove the wrench from the square hole.
Replace the Drive Belt:
Remove the old drive belt and replace it with a new one, ensuring the new belt is properly seated on all pulleys.
Release the Rear Tensioner:
Use a 1/2 inch prybar or 1/2 inch ratchet to rotate the tension arm on the rear (smooth pulley) tensioner downward (counterclockwise) until you can remove the locking bolt.
Slowly release the tension arm all the way up, being careful not to let it move suddenly.
Release the Front Tensioner:
Remove the locking bolt from the front tensioner using the same method as the rear tensioner.
Final Check:
Perform a final inspection to ensure that both drive belts are properly aligned and seated on all pulleys.
Completion:
Close the hood, reconnect the battery, and remove the wheel chocks.
By following these steps, you can successfully replace the drive belt on a Cummins DD13, DD15, or DD16 engine, ensuring smooth operation and avoiding potential damage to the tensioner assembly.
No related posts.
How useful was this post?
Click on a star to rate it!
Average rating / 5. Vote count:

Some Friends don't know how to activate win7, when they receive the diagnostic software with win7 sytem. http://www.chinaobd2.com/upload/software/win7activation.zip download this Read more

Please ensure that you choose computer systems that meet our requirements for the installation. You will find adetailed listing in Read more

Frequent oil changes are perhaps the most important procedure you can do to maintain and prolong the life of your Read more

This article show a guide on how to use G-scan2
Please keep this link if you copy the post!