Skip to content
Menu
OBD2 Scanner Blog
  • Home
  • Car Diagnostic Tool
    • MB Star Diagnosis
    • BMW Diagnostic Tool
    • GM Tech2
    • Volvo Vocom Interface
  • OBD2 Code Scanner
    • VXDIAG
  • Tech Support
OBD2 Scanner Blog

CLAAS LEXION 8900-5300 Perkins 2206 D-E13TA Engine Oil and Oil Filter Change Procedure

Posted on December 8, 2024December 8, 2024 by VCDS

Diagzone Xdiag Subscription Renew, LAUNCH LTR-01 RF Sensor, Thinkdiag Renew , Scania SDP3 Installation

CLAAS LEXION 8900-5300 Perkins 2206 D-E13TA Engine Oil and Oil Filter Change Procedure

This guide outlines the steps to change the engine oil and oil filter in a CLAAS LEXION 8900-5300 equipped with a Perkins 2206 D-E13TA diesel engine.

Related Contents:

CLAAS WEBTIC OFFLINE ENGLISH 2024.07 Contains Repair Manuals and Service Information
CLAAS Truck Diagnostic Tool CDS V7.51 Agriculture Tractor Claas Diagnostic Kit (CANUSB) Metadiag Diagnostic System

CLAAS LEXION 8900-5300 Perkins 2206 D-E13TA Engine Oil and Oil Filter Change Procedure

Applies to: Perkins 2206 D-E13TA diesel engine

Required Materials:

Oil collecting container
Oil hose
Protective gloves

Preparation

Park and Secure the Machine:

Park the machine on a level surface.
Turn off the machine and secure it to prevent any movement.

Clean the Engine Area:

Clean the diesel engine and its surroundings to prevent contamination.

Locate the Oil Filler Neck and Oil Filter:

Refer to the engine overview to find the oil filler neck and oil filter.

Remove the Oil Filler Cap:

Unscrew the oil filler cap to allow for easier draining.

Draining the Oil

CLAAS LEXION 8900-5300 Perkins 2206 D-E13TA Engine Oil and Oil Filter Change Procedure

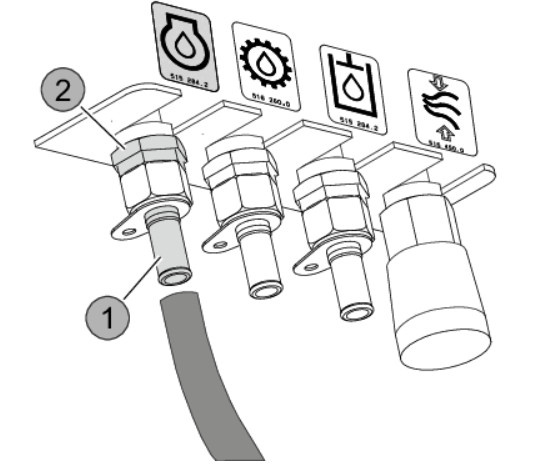
Position the Hose and Container:

Insert the hose into the drain connection.
Place the oil collecting container under the end of the hose.

Loosen the Drain Nut:

Loosen the drain nut to allow the oil to flow out.
Caution: Wear protective gloves to avoid burns from hot fluids and machine parts.

Drain the Oil:

Allow the oil to drain completely into the container.
Tighten the drain nut once draining is complete.
Remove the hose from the drain connection.

Changing the Oil Filter

CLAAS LEXION 8900-5300 Perkins 2206 D-E13TA Engine Oil and Oil Filter Change Procedure

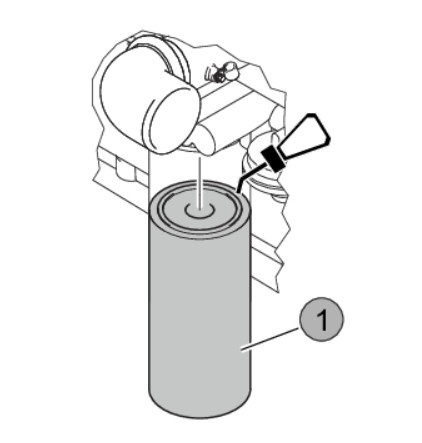
Position the Collecting Container:

Place the oil collecting container under the oil filter.

Remove the Old Filter:

Use a strap wrench to loosen the oil filter.
Note: Be careful not to tilt the filter to avoid damaging the filter head.

Discard the Old Oil and Filter:

Collect and properly dispose of the old oil and filter.

Prepare the New Filter:

Do not pre-fill the new filter with oil.
Lightly coat the seal of the new filter with fresh oil.

Install the New Filter:

Screw in the new filter by hand until the seal contacts the filter head.
Tighten the filter by hand only; do not use tools.

Topping Up the Oil

CLAAS LEXION 8900-5300 Perkins 2206 D-E13TA Engine Oil and Oil Filter Change Procedure

Add New Oil:

Pour new oil into the oil filler neck until the oil level reaches the maximum mark on the oil level gauge.
Caution: Do not exceed the maximum oil level, as this can cause engine damage.

Check the Oil Level:

Verify the oil level with the gauge and top up if necessary.

Secure the Filler Cap:

Screw the oil filler cap back onto the filler neck.

Final Steps

Check for Warnings:

If a warning message appears on the CEBIS display, switch off the engine immediately.

Allow Oil to Settle:

After topping off the oil, switch off the engine and wait 10 minutes for the oil to drain back into the oil pan.

Final Oil Check:

Check the oil level again and add oil if necessary.

By following these steps, you can successfully change the engine oil and filter on your CLAAS LEXION 8900-5300 with a Perkins 2206 D-E13TA diesel engine.

No related posts.

How useful was this post?

Click on a star to rate it!

Average rating / 5. Vote count:

This Post: CLAAS LEXION 8900-5300 Perkins 2206 D-E13TA Engine Oil and Oil Filter Change Procedure From ChinaOBD2 Official Blog
Please keep this link if you copy the post!

Tags: cat Diagnostic System

Post navigation

Prev: Prev: How to Choose diagnostic tools for DPF regeneration and code clearing
Next: Next: Solution for Autel IM608 BMW FEM/BDC SWFL “Version Not Supported” Error

Related Posts

BMW 35160 & 35080 EEPROM Odometer Correction By Yanhua 35xx Emulator

BMW 35160 & 35080 EEPROM Odometer Correction By Yanhua 35xx Emulator

2019.02.24

Toyota Servo Motor Initialization by Launch X431

Toyota Servo Motor Initialization by Launch X431

2019.02.27

How to Remove Temperature Sensor for MTU 12-16v Engine

How to Remove Temperature Sensor for MTU 12-16v Engine

2024.08.10

How to Connect NEXIQ First-Link using Smartphone

How to Connect NEXIQ First-Link using Smartphone

2024.01.24

How to Use Cat ET and Cat 478-0235 Adapter 3 to Do ECM Clearing for Caterpillar

How to Use Cat ET and Cat 478-0235 Adapter 3 to Do ECM Clearing for Caterpillar

2024.01.24

SmartPRO 5000U-PLUS 5000u Plus Universal USB Programmer PCF29XX Chips Support List

SmartPRO 5000U-PLUS 5000u Plus Universal USB Programmer PCF29XX Chips Support Li...

2023.06.7

V48.88 SBB Pro2 Key Programmer Support Cars to Year 2017

V48.88 SBB Pro2 Key Programmer Support Cars to Year 2017

2018.12.17

Launch DIY Scanner CReader 8021 Full OBD2 diagnostic Scanner OBD+ABS+SRS+Oil+EPB+BMS+SAS+DPF

Launch DIY Scanner CReader 8021 Full OBD2 diagnostic Scanner OBD+ABS+SRS+Oil+EPB...

2018.12.17

Launch X431 Elite 2.0 FGC Unlock FCA SGW without 12+8 Cable

Launch X431 Elite 2.0 FGC Unlock FCA SGW without 12+8 Cable

2024.12.24

How to choose CG ECU Programmer?

How to choose CG ECU Programmer?

2023.04.1

Leave a Reply Cancel reply

Your email address will not be published. Required fields are marked *

Recent Posts

  • ECUDESK Software Latest ECU Support List (2025.05)
  • Yanhua Module 38 Update BMW BDC2 Reflash and Replace Functions
  • Vapon Update BDC2 IMMO Module Data Erase
  • How to Replace U17 and L8 Components for OBDSTAR G3 Startup Failure?
  • Alientech Kess3 Adds Master TCU OBD-Bench-Boot Protocol

Recommend OBD2 Scanner

ME9.7 ECU Engine Computer ME9.7 ECU Engine Computer TabScan T6PT3G Diagnosis VCI for Porsche Diagnostic Tool Porsche Diagnostic Tool

Recent Comments

  • amr on MAN EOL Flash File Editor + MAN Immo Calculator Free Download
  • Pasquale Greenwald on Jungheinrich ETM/V 10-12 Tightening Torque for Screwed Connection on Brake Systems
  • VCDS on Scania SDP3 2.53.1 Diagnosis & Programming Free Download
  • Crossley on What are the functions of Iprog+ Programmer?
  • Lukas on VAG EDC15 EDC16 IMMO OFF Software Free Download

Archives

Categories

  • BMW Diagnostic Tool
  • Car Diagnostic Tool
  • Key Cutting Machine
  • Key Programming Tool
  • MB Star Diagnosis
  • OBD2 Code Scanner
  • Tech Support
  • VXDIAG

Tags

adapter Auto Pick and Decoder Car Key Copy Car Key Programmer cat Code Reader diagnostic software ECU Chip Tunning ecu programmer Ford gm handy baby Handy Baby 2 Key Programmer Handy Baby II Key Programmer HEX V2 immo iprog key Key Pro key programmer laptop Launch lish LISHI new arrivals nexiq nexiq link diesel truck interface nexiq truck diagnostic NEXIQ USB Link OBD2 obdii original program Scania VCI smart VAG COM Cable VCDS VCDS Cable VCDS VAG COM Cable vci VW wholesale X-PROG Box X-PROG Box ECU Programmer XPROG-M

Hot Selling

  • ME 9.7 ECU Engine Computer
  • MINI VCI J2534
  • NCF29XX Programmer
  • ThinkTool Pros+

Links

  • China OBD2
  • EPS Foam Machine
  • Foxdiag
  • Сканер OBD2
©2025 OBD2 Scanner Blog | Powered by chinaobd2