Diagzone Xdiag Subscription Renew, LAUNCH LTR-01 RF Sensor, Thinkdiag Renew , Scania SDP3 Installation

The Caterpillar 311F LRR – JFT Crawler Excavator is a powerful and reliable machine designed for heavy-duty excavation tasks. One crucial component of this excavator is the engine oil cooler, which ensures that the engine oil maintains optimal temperature for smooth operation. This guide outlines the steps for installing the engine oil cooler on a Caterpillar 311F LRR – JFT crawler excavator.
Required Tools and Parts
CAT Caterpillar ET 3 Diagnostic Adapter 317-7485/478-0235
Engine oil cooler assembly
New gaskets and O-rings
Bolts (various sizes as specified)
Torque wrench
Coolant and engine oil
Installation Steps
Inspect Parts:
Ensure all parts are not worn or damaged. Replace any worn or damaged parts as needed.
Assemble the Engine Oil Cooler (if disassembled):
Clean the Engine Oil Cooler Base:
Ensure the engine oil cooler base (12) is clean and free of damage and blockage. Replace if necessary.
Clean the Housing:
Ensure the housing (10) is clean and undamaged. Replace if necessary.
Install New Gasket:
Position the new gasket (11) on the engine oil cooler base (12).
Install the engine oil cooler base (12) onto the housing (10).
Attach Bolts:
Install bolts (13) and (14) to the oil cooler assembly (3). Tighten bolts to a torque of 25 N-m (221 lb-in).
Prepare the Cylinder Block:
Clean the sealing pad surface on the cylinder block.
Install New Gasket:
Position the new gasket (4) on the engine oil cooler.
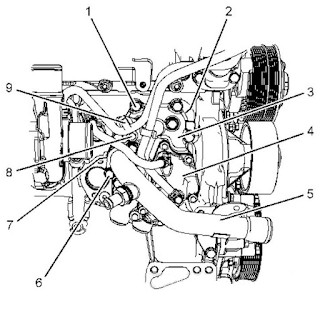
Attach Engine Oil Cooler Assembly:
Install the engine oil cooler assembly (5) onto the cylinder block.
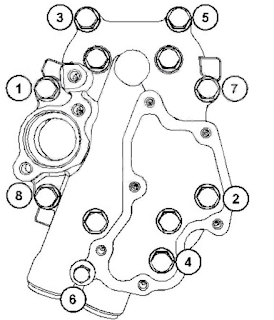
Install bolts (1) to the oil cooler assembly (3). Ensure bolts of different lengths are correctly positioned.
Tighten bolts (3) to a torque of 25 N-m (221 lb-in) in the specified order (refer to Figure 2 in the manual).
Install Bracket:
Position the bracket (9) on the engine oil cooler (3).
Install bolts (8) onto the bracket (9) and tighten to a torque of 15 N-m (133 lb-in).
Install Booster Chamber Cover:
Refer to the Disassembly and Assembly guide, “Turbocharger-Install” for correct steps.
Install Turbocharger Drain Pipe Assembly (if necessary):
Refer to Disassembly and Assembly, “Turbocharger-Install” for the correct steps.
Install New O-Ring Seal:
Place the new O-ring seal (7) onto the tube assembly (5).
Attach Pipe Assembly:
Install pipe assembly (5) onto the engine oil cooler (3).
Install bolts (6) to the tube assembly (5) and tighten to a torque of 25 N-m (221 lb-in).
Connect Coolant Hose:
Connect the coolant hose to the tube assembly (5).
Install Alternator:
Follow the steps in Disassembly and Assembly, “Alternator-Installation” for proper installation.
Fill Cooling System:
Fill the cooling system to the correct liquid level. Refer to the Operation and Maintenance Manual, “Cooling System Coolant-Replace” for the correct procedure.
Refill Lubrication System (if necessary):
If the engine oil was drained, refill the lubrication system following the Operation and Maintenance Manual, “Engine Oil and Filter-Replacement”.
Check Engine Oil Level:
Verify the engine lubricating oil level according to the Operation and Maintenance Manual, “Engine Oil Level-Check”.
By following these steps and adhering to the official Caterpillar service manual, you can successfully install the engine oil cooler in your Caterpillar 311F LRR – JFT Crawler Excavator. Regular maintenance and proper installation of components like the engine oil cooler will ensure that your excavator operates at peak performance and reliability.
More topics for Caterpillar, please refer to:Caterpillar Trouble Repair.
Related posts:
Installation Guide for Oil-Water Separator and Fuel Filter on Caterpillar 311F LRR JFT Excavator
How to Use CAT Electronic Technician WinFlash Function
How to Use the Cat ET 2023A LED Pair Configuration Function
CAT Caterpillar ET FAQ
How useful was this post?
Click on a star to rate it!
Average rating / 5. Vote count:

Some Friends don't know how to activate win7, when they receive the diagnostic software with win7 sytem. http://www.chinaobd2.com/upload/software/win7activation.zip download this Read more

Please ensure that you choose computer systems that meet our requirements for the installation. You will find adetailed listing in Read more

Frequent oil changes are perhaps the most important procedure you can do to maintain and prolong the life of your Read more

This article show a guide on how to use G-scan2
Please keep this link if you copy the post!