
Diagzone Xdiag Subscription Renew, LAUNCH LTR-01 RF Sensor, Thinkdiag Renew , Scania SDP3 Installation
This instruction show you guide on how to remove and install fuel injection pump for Bobcat Utility 3450 vehicle.
Related Contents:
Bobcat Service Analyzer 90.00 89.06 Diagnostic Software Free Download
Procedures:
Fuel Injection Pump Removal:
Notice: Do not bend the high pressure fuel injection tubes when removing or installing them.
Do not attempt to maintain or adjust unless you are trained and have the correct equipment.
NOTE: When you remove any fuel system component to perform maintenance (such as changing the fuel filter), put an approved container under the opening to catch the fuel.
NOTE: NEVER use a shop rag to catch the fuel.
Vapors from the rag are flammable and explosive. Wipe up any spills immediately.
NOTE: NEVER use diesel fuel as a cleaning agent.
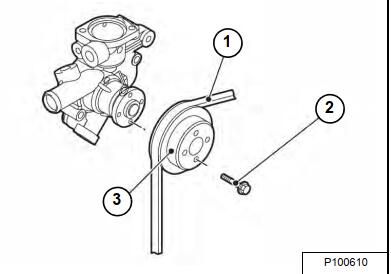
Loosen the cooling pump V-belt (Item 1) by loosening the alternator.
Remove the engine pulley guard (if equipped), engine cooling pulley bolts (Item 2), V-pulley (Item 3) and V-belt.
Close any fuel valves in the fuel supply line.
Place a drain pan under the fuel injection pump to catch any spillage.
Clean the area to keep contaminants from entering the fuel system.
Remove the high-pressure fuel injection lines as an assembly. (See High-Pressure Fuel Injection Lines
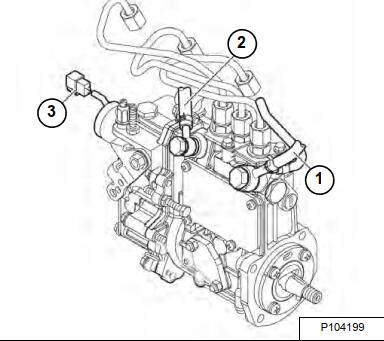
Disconnect the fuel return lines from the fitting on the fuel injection pump (Item 1).
Plug the open ends of the lines to minimize leakage and prevent contamination.
Remove the fuel supply line (Item 2) from the fitting on the fuel injection pump.
Plug or cap all openings to minimize leakage and prevent contamination.
Remove the throttle cable from the fuel injection pump.
Disconnect the stop solenoid wiring connector (Item 3)
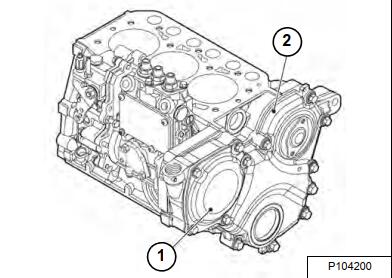
Remove the fuel injection pump drive gear access cover (Item 1) from the gear case cover (Item 2) NOTE: The cover is secured with an adhesive sealant. Use a gasket scraper to separate the cover from the gear case cover.

To aid in assembly, make alignment marks (Item 1) on the pump drive gear and idler gear.
NOTE: Mark the gears with something that will not rub off or be affected by oil and become illegible. If the gears are not marked or are illegible during installation, the gear case
cover must be removed to properly time the injection pump gear.
NOTE: After marking the position of the pump drive gear, do not rotate the engine crankshaft.
Rotating the crankshaft will cause the fuel injection pump to become misaligned.
Hold the gear train stationary using a wrench on the crankshaft pulley bolt. Remove the fuel injection pump drive gear retaining nut and washer (Item 2)
NOTE: Do not loosen or remove the four bolts retaining the fuel injection pump drive gear to the fuel injection pump hub. Do not disassemble the fuel injection pump drive gear from the hub.
Thread the drive gear nut onto the injection pump shaft until it is even with the end of the shaft. This will prevent the gear from falling off of the shaft when using the puller.
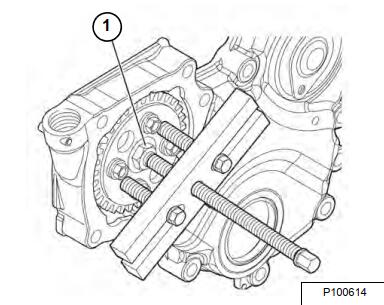
Remove the injection pump drive gear and hub from the injection pump drive shaft as an assembly using an appropriate gear puller.
Once the fuel injection pump drive gear and hub assembly have
How useful was this post?
Click on a star to rate it!
Average rating / 5. Vote count:

Some Friends don't know how to activate win7, when they receive the diagnostic software with win7 sytem. http://www.chinaobd2.com/upload/software/win7activation.zip download this Read more

Please ensure that you choose computer systems that meet our requirements for the installation. You will find adetailed listing in Read more

Frequent oil changes are perhaps the most important procedure you can do to maintain and prolong the life of your Read more

Please keep this link if you copy the post!